

Do you sometimes feel like you don’t get the results you want out of a certain exercise? Do you toil away week after week performing a specific move gaining little, losing faith in the program you've committed yourself to?
Sometimes the smallest adjustment can make or break a great workout. Setting up your shoulders a certain way, aligning your knees a certain angle or stabilizing your midsection are just a few minor items on the docket for a better training experience.
Below are eight common errors in eight of the more common exercises. Give yourself an honest assessment and try a few of these tips, you might be pleasantly surprised the next time you take a progress pic.
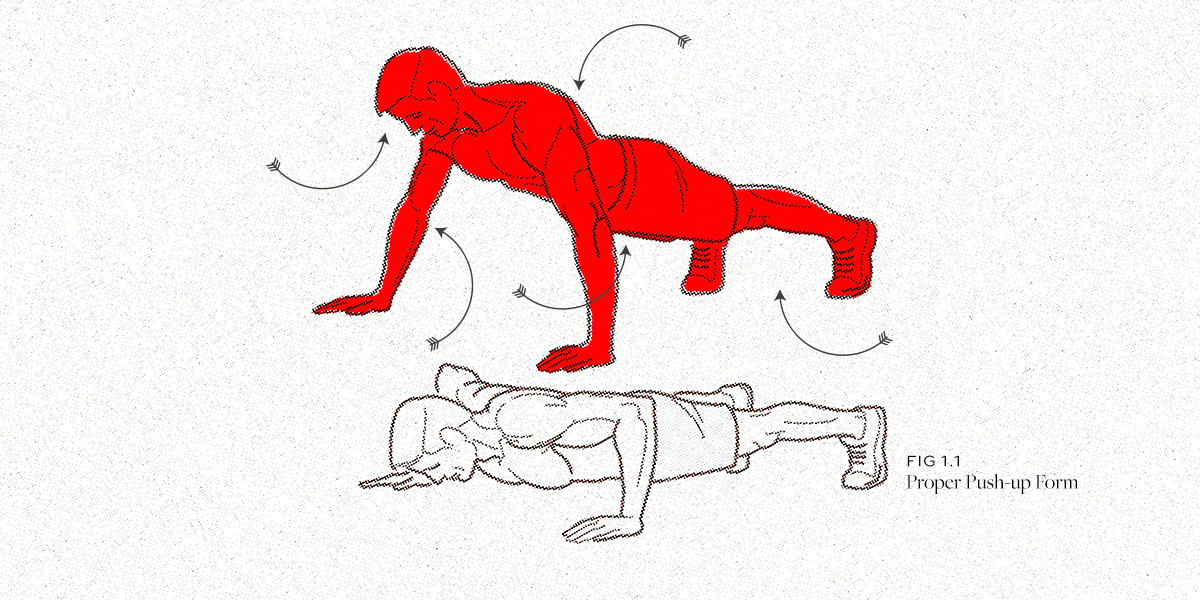
Proper push-up form
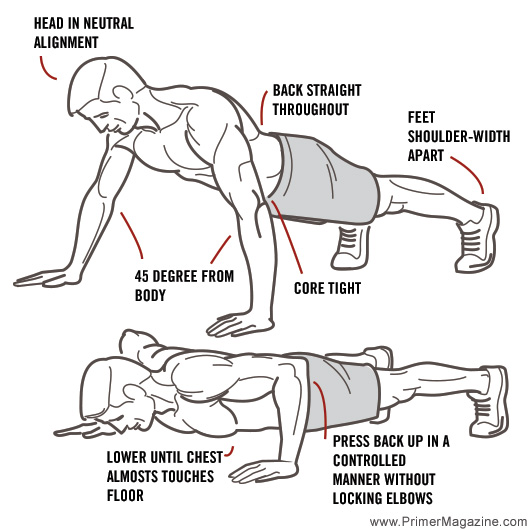
Now, I know what you are thinking; how do you screw up a push-up? Oh, let me count the ways. Improper hand position, a bowed back, short, choppy reps and shallow depth just to name a few.
As the push-up can be performed many different ways such as feet elevated, close-grip, hands elevated, staggered hands, elbows in, etc., there are still some hard and fast rules when executing any version.
Get into a normal push-up position: feet about shoulder width apart, hands flat on the ground so there is approximately a 45 degree angle to the body, core tight and head in a neutral alignment. Descend toward the floor slowly until you almost touch your chest and then press back up in a controlled manner without locking your elbows and maintaining a straight line while keeping your abs tight.
→ Now use it: Science Determined The Perfect Home Bodyweight Workout & It Only Takes 7 Minutes
Proper pull-up form
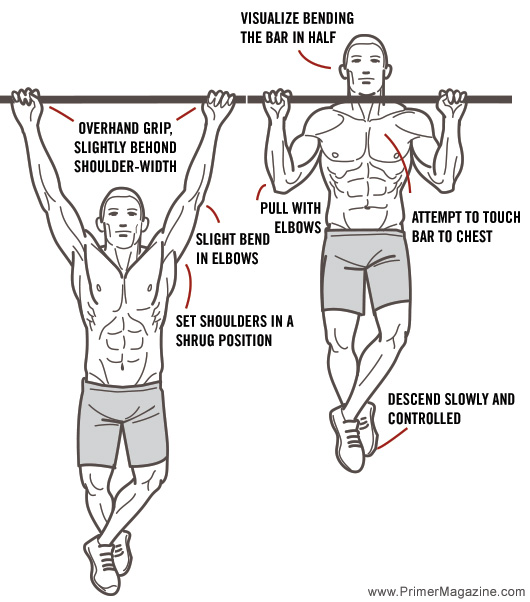
As one of the most difficult and hated exercises around, the pull-up is often looked at as a barometer regarding an individual’s shape and ability. No, I am not talking about the kipping pull-up that has caught on at certain gyms these days; I am talking about the good ole fashioned pull-up with proper form and technique guaranteed not to yank an arm out of the socket.
As with many of the exercises listed above pull-ups can be performed a variety of ways – wide-grip, close-grip, reverse grip just to name a few. For simplicity, I will go into detail about the medium-grip, overhand pull-up.
Grasp the bar just beyond your shoulder width with an overhand grip. Set-up your shoulders in a shrug-up position and a slight bend in the elbows. Pull yourself up attempting to touch your chest to the bar and squeeze your shoulder blades together. Pull with your elbows and not your hands as you visualize trying to rip the bar in half. Descend back to the starting position maintaining the slight bend in your elbows.
Proper bench press from
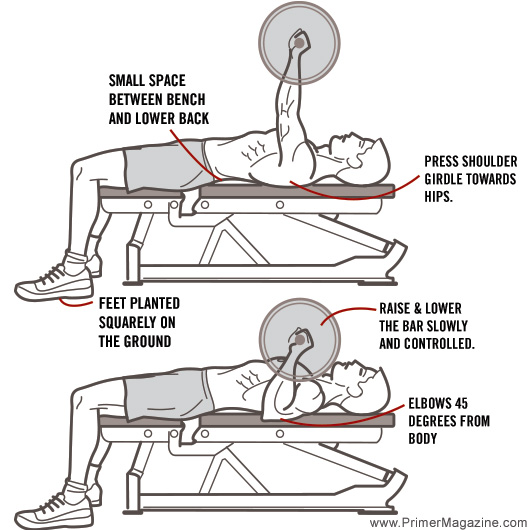
Judging by their body English, many lifters look like they are unintentionally trapped under the bar while bench pressing. Their shoulders are jetted forward, butts off the bench and legs flailing all over. Whether you perform this exercise with dumbbells, barbells, on a flat, incline or decline bench, the bench press has a specific set-up prior to the actual lift.
Lying down on the bench, press your shoulder girdle down toward your hips and back toward the bench. This will lift your ribcage for a stronger position for the pecs. Doing this will also create a small space between your lower back and the bench – just be sure your upper back and butt are still in solid contact with the bench. Your elbows should be about 45 degrees from your body; not tucked in to your ribs or straight out to the sides.
With your feet firmly and squarely planted on the ground, perform your reps with slow and controlled technique – no bouncing or throwing of the bar. Lower the bar slowly and purposely explode back up.
Proper squat form
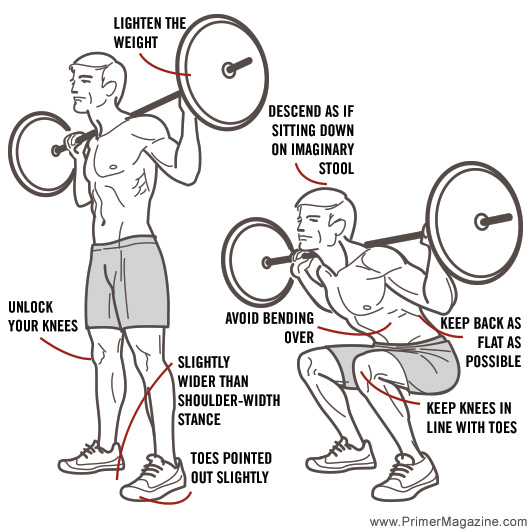
Ah, the squat. Arguably the most misunderstood exercise. When performed properly it can be an invaluable tool toward more muscle and strength while also turning on your fat-burning furnace. Unfortunately, the biggest culprit commonly ends up being too much weight. This in-turn affects squat depth and potential knee, back and hip injury.
First and foremost, take some weight off the bar. The goal is to squat deep and effectively – that is the only way to properly increase strength and put on some appreciable muscle to your legs. Position the bar on your traps and take a slightly wider than shoulder width stance. Point your toes out slightly and unlock your knees.
Descend dropping your hips as if you were going to sit down on a small stool below you, keep your knees in line with your toes and try to keep your back as flat as possible. Also, try to avoid bending forward too much (a slight bend is inevitable to a degree, especially with taller lifters).
When your glutes are lower than your knees, squat the bar back up starting with your hips again, keeping your knees in line with your toes and flexing your midsection to help keep your back stable. At the top position maintain a slight bend in your knees and perform your next rep.
Proper biceps curl form
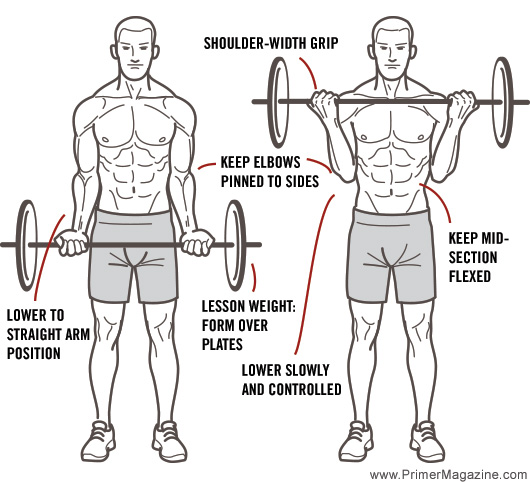
Nothing is sadder than seeing someone do back-breaking rep after back-breaking rep of biceps curls with nothing to show for it. If some weight is good, more must be better, right? I see it every day, someone loading the bar with too much weight, heaving and huffing the bar up with every ounce of momentum salvageable, back, shoulders, chest and even legs flexing the bar up. The poor tiny biceps don’t have a chance.
Although weight and intensity are required to illicit results, going to extremes while sacrificing proper form and technique is a surefire recipe for disaster. Not only will you negate any benefit you will also set yourself up for potential injury – serious injury.
Again, lighten your load with a weight that is manageable. Grasp the bar with a shoulder width grip. Start from a completely straight arm position and curl the weight up while keeping your elbows pinned by your side and your midsection flexed for better back stabilization. Flex the biceps hard at the top position and lower under control back to a straight arm position.
Proper dumbbell side lateral raise form

When I see a lateral raise done incorrectly it reminds me of a dying moth – flailing arms, a feet-together stance and a whole lot of bending of the knees. I scratch my head and wonder what the heck is that working? Everything but deltoids.
To get the absolute most out of side lateral raises, start with a shoulder width stance. This will give you stability so you can focus on the muscle worked and not worry too much about balance. Hold the dumbbells by your sides and not in front of you like most lifters. Raise the dumbbells out to the sides in a wide arc while keeping a very slight bend in the elbows.
When lifting to the sides lead with your pinky fingers and keep that position the entire time. Forget the old adage of “pretend you are pouring a pitcher” model. Leading with your pinkies will force the elbows to raise and better isolate the middle deltoids. Lower under control back to your sides and repeat.
Proper lat pull-down form
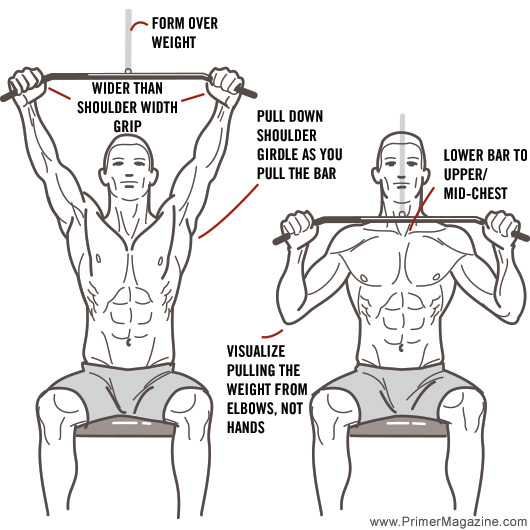
As the pull-ups little brother, the lat pull-down can be an effective exercise when performed correctly. Form is paramount with pull-downs despite the heaving and swinging that is commonplace.
Foregoing your ego and shoring up your technique is the only way to make a so-so exercise into an effective alternative to the pull-up. Sit squarely on the seat and grasp the bar outside of your shoulder grip. To start, pull the bar down breaking the line in your elbows and raise your shoulder girdle (almost like the top position of a shrug). In one motion, pull the bar down while pulling down on your shoulder girdle (the down position of a shrug) until the bar reaches your upper-to-mid chest. Squeeze and return the bar to the top position keeping a slight bend in your elbows and raising your shoulder girdle once again.
Another key tip is to visualize pulling the weight with your elbows instead of your hands. This will emphasize more lat involvement and less biceps.
Proper parallel bar dip form
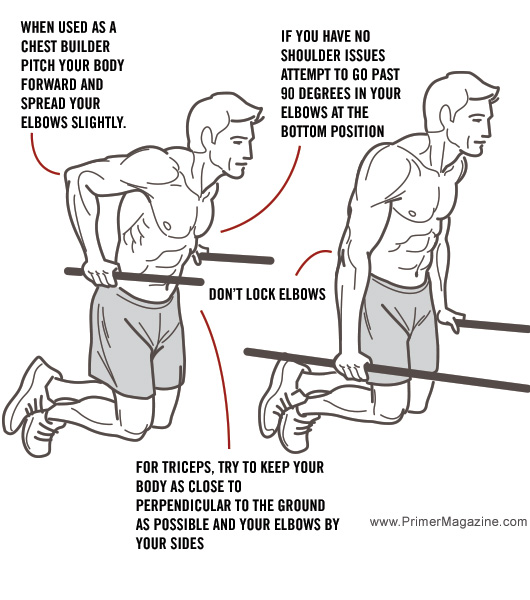
Used as both a chest and triceps builder, parallel bar dips are a true measure of body weight strength and control. However, too many lifters are quick to add extra weight without perfecting their form. Shallow reps, kipping of the legs and a failure to use proper upper body positioning are just a few of the screw-ups seen everywhere.
When used as a chest builder pitch your body forward and spread your elbows slightly. This will position the chest as the main mover. For triceps, try to keep your body upright (as close to perpendicular to the ground as possible) and your elbows by your sides.
If you have no shoulder issues attempt to go past 90 degrees in your elbows at the bottom position. Feel a stretch and then ascend to the top. If you are working your chest, avoid locking your elbows. If you are trying to stress your triceps, make sure to squeeze at the top.
These are just a few of the many exercises to honestly assess and correct for a more beneficial and effective workout. Of course, everyone is built slightly differently so you will have to tweak a few things to conform to your own individual structure and ability.
Take action: