

Being handy with tools is more than showing off. Being “that guy” in your circle of friends is nice—if not a little tiring, what with all the requests to fix everything—but for those of you who want to become the guy who knows how to fix little problems here and there, there’s usually one obstacle.
How the hell do you learn? Watch reruns of Bob Vila on TV? (Who was not available, very unfortunately, for this piece.)
Sometimes, it’s guess and check. Sometimes it’s learning from your old man. Other times, you’re simply the only guy who reads the instructions. No matter what, though, knowing your way around the toolbox is always a good thing. These 10 things will help you around the house—and may spur you on to learn more.
1. Pull the Ole Nintendo on Your Garbage Disposal
A broken garbage disposal is actually a huge headache. Sure, you might have gotten along fine before you had one, but those were the days that dishes took a year to do.
Before you begin, make sure you get under the sink and unplug the disposal unit itself (Many sinks have an outlet underneath them, just open the door and poke around for it.). If you can’t find that, flip the circuit breaker that gives power to the disposal. Seriously. You can’t skip this step because, if for some reason it turns on while you’re removing any stuck-on food in there, you will regret it.
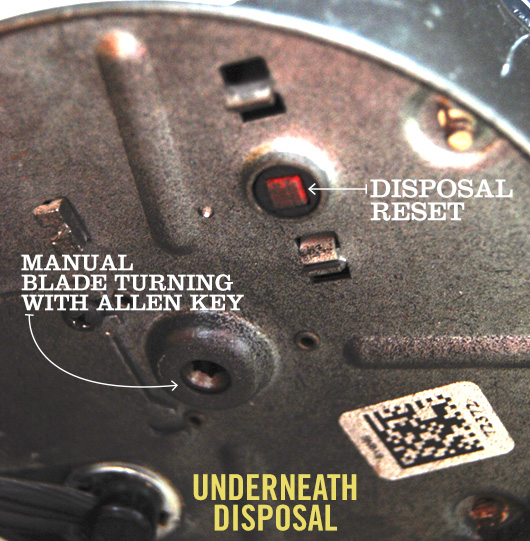
Once the power is off, duck under the sink again and find a button underneath the cylinder that houses the disposal mechanism. This is the reset button. Push it. You should hear a click to let you know you’ve done it.
Next, see if you can locate any debris stuck inside the mouth of the disposal. This is when you need to be absolutely certain that no power is going to it. Remove everything you can.
Flip the power back on and check if it’s working. If so, congratulations. If not, there is still one last thing you can do: manually dislodge what’s keeping the blades stuck. For this method, you’ll need an Allen wrench/hex key. There is a small socket in the middle of the bottom of the disposal unit the key can fit into. Turn the key either way—this is essentially moving the grinders of the unit manually. Turn back and forth a couple times to ensure you got what was keeping the grinders stuck and try flipping the switch again. This should take care of it.
2. Stop a Toilet that Doesn’t Stop Running
That sound. It’s a torturous sound that can keep a guy up at night. Sure, the severity varies (there was once a toilet in the basement of the apartment building in which I was living that blew something so hard – it was spraying water up with enough force that it hit the ceiling – and shook the floors of my first-floor apartment), but a toilet’s importance can never be understated.
A constantly running toilet not only drives you nuts, it can waste money, too—flushing dollars down the drain and into the septic tank when your water bill shows up.
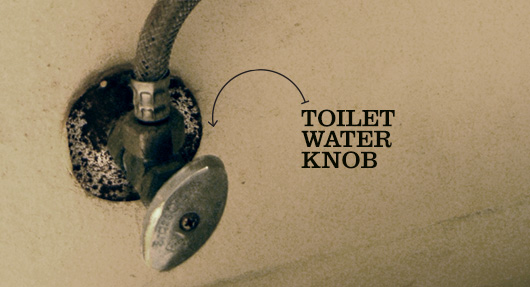
First things first: If your toilet is running, reach behind it and turn the water off (There’s usually a knob behind it that controls the flow.).
Next, lift the top of the tank. More often than not, you’ll find that the flapper or the flush valve has a problem, leaving the tank constantly emptying into the toilet bowl.
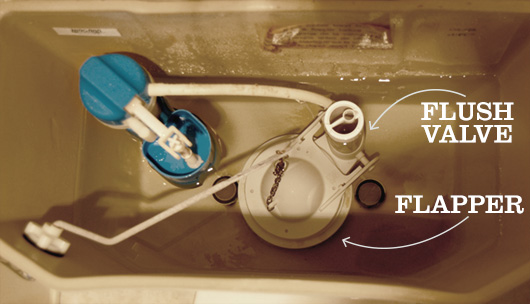
The fix can range from a readjustment of the float and the arm (so the tank gets plugged) to a complete replacement of the tank’s interior parts—a fix that might run you $20. It’s mostly a snap-and-place fixture and you should be able to figure it out just by looking at it.
3. Hammer a Nail—Not Your Hand
There’s nothing like hammering a nail perfectly. There’s an art to it. Hitting the nail square on the head.
The problem is, it might not happen all the time—just like the idiom suggests.
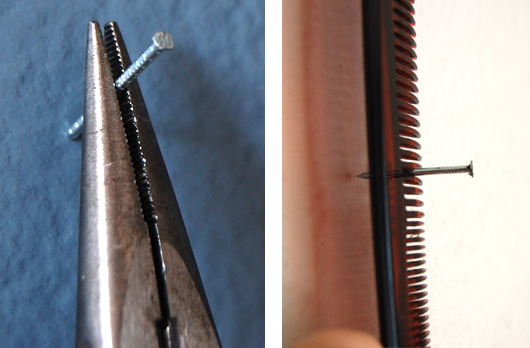
To assuage your fear of bashing your fingertips while driving a nail into a harder material that requires some force, set the nail in place and hold the rod with pliers as you hammer away.
If you don’t have pliers, a fine-toothed plastic comb works wonders, too. If you’re working with multiple nails in close proximity, you can also use it as a rudimentary straight edge as well. Plus, you can make sure your pompadour stays perfect—it’s a win-win-win.
4. Fix a Clogged Drain
Perhaps one of the most frustrating things, a clogged drain can force you under the sink with a monkey wrench for a good part of a night. The trick here is to think strategically.
Many clogs can be fixed with liquid or gel drain cleaners, but if you’re facing something that’s got the whole thing backed up, get ready for a potentially messy fix.
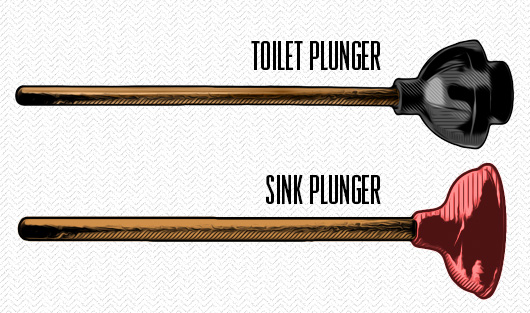
First, you can try plunging it—yes, with the same tool that you might have thought was only for the toilet. (If you’re working with a bathroom sink, be sure to clog the overflow hole that’s near the top of the basin.)
Plunge it like you normally would a toilet—with a sink plunger of course. The next time you’re around a plunger, take a look at it. Does it have an extended part that goes beyond the dome shape? If so, that’s a toilet plunger—that extra three inches or so is to get deep down into the basin. If it’s just the dome/bowl, then you very well might be using a sink plunger to do a toilet plunger’s job. There is a difference, so take note.
If that doesn’t work, search for a clean-out plug on the main pipe. This handy opening (once unscrewed with a wrench) gives you access to the pipes without disassembly. Use a flexible, but tough brush to get in there and poke around to see if you can clear out any blockages. (Be very careful if you've already poured drain cleaners down the drain.)
Be sure to have a bucket on hand below the plug, though, as you don’t want any water splashing down on the floor while you wow everyone with your plumbing skills.
If you’re having some bad luck with the toilet and you find yourself without a plunger or if the plunger fails you, pour about a cup of dish detergent down there. It’ll act as a lubricant for the clog to wash down. You’ll need to let that work its magic for about 10 minutes. But while you’re waiting, grab a good amount of hot tap water—we’re talking multiple quarts here—but not hot enough that it’s boiling. Pour it into the toilet bowl from an elevation (not so high as to splash clogged toilet water everywhere). Pour in the water and just the whole mess will go down the drain.
5. Know Your Homemade Cleaning Solutions
Before you go mixing all the industrial-strength chemicals you have under your sink to create a Frankenstein mega cleaner, know a few things about what you’re mixing first—you could go Walter Whiting yourself without realizing it.
Now, we know that you don’t need no instructions to know how to do a good job. But’s it’s hard to do a good job when you’re overcome by chlorine gas—you know, the stuff the Germans used in World War I, which is created when you mix bleach and vinegar. Mixing bleach with ammonia, you’ll end up with some nitrogen chlorides, another nasty airborne poison. Just know what’s in the things you’re using. Here are some usual suspects that, while you might not think it, most likely contain ammonia:
- Glass cleaners
- Multi-surface cleaners
- Chemical drain cleaners
- Toilet/bathroom cleaning solution
Yes, there are bleaches that don’t contain sodium hypochlorite, but it’s not worth risking, really. But when it comes to stain removal and household cleaning, baking soda and white vinegar on their own or in conjunction work well.
Pouring down 1 cup of baking soda and 1 cup of vinegar can clear a clogged drain. (Finally, a reason to recreate the volcano you made for the science fair.) Just be sure to wash it down afterward.
6. Use Science to Strip Paint
People love the smell of finish and paint. It smells like victory (Or was that something else…?).
Anyway, there’s not a lot that can truly drastically change the look of something as quick and easy as refinishing or repainting wood. If you’re in possession of something wooden you can’t part with or can’t stand to look at (but love for its form), getting it just the way you want is simple.
Don’t use a sander or pull your back sanding by hand. Use science.
There are chemical strippers out there that are not only safe for the environment, they work without any truly hard physical labor. And while you might think it detracts from the masculinity of what you’re doing, it’s simply not so. A chemical stripper can let you instead work on lovingly varnishing or staining your wood so that you can truly create a piece of art—not waste time breaking your back. Simply spray or paint it on, let it sit for a while, then come back and scrape the paint right off. It works like a charm.

7. Find a Stud Without a Stud Detector
If you find yourself on a weekend project with one of your buddies who wants to get his new flat-screen TV up on the wall, ask yourself two things: Will he let you come over to watch The Walking Dead on it, and does he know what the hell he’s doing?
In a perfect world, we’d be able to hang up heavy framed photos and flat screens anywhere we want on a wall for optimal viewing pleasure. But this is reality. And reality sometimes has you looking at bracketing on the floor and wondering what to do next.
Luckily, finding a stud—one of the most important things to know how to do as a beginner handyman—doesn’t require you going out and getting an electronic that looks very similar to a Taser and costs a pretty hefty amount for finding wood beams behind walls.
There are two ways to do this: an electric razor and a magnet. (You can knock on sheetrock, but this is a guess-and-check type method.)
For the razor or clippers. Turn it on and drag it flat across the wall. You should be able to hear a change in pitch. Keep in mind that studs are usually about 16 inches apart from one another, so you should be able to get a good idea of where each one is if you think you hear a tonal difference.
The more old-school method is to get a strong magnet attached to twine or thread and drag it along the wall. Since drywall is usually only a little more than a half inch thick at max, a powerful magnet can cling to any metal in the studs behind it.
8. Caulk Like a Pro
Caulking is an art form. The first step, as with most projects, is to make sure the surface you're working on is clean. Use isopropyl alcohol, this usually breaks down any oil or residue that could make the caulk not stick properly.
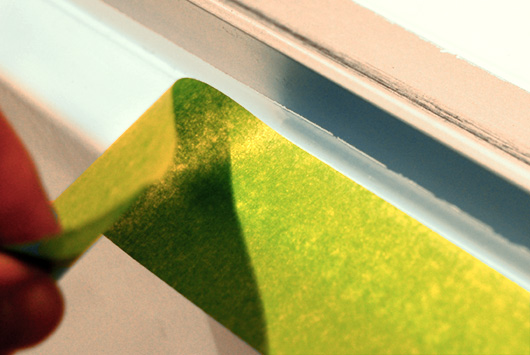
Next, use some tape on either side of the surface you’ll be caulking. This, like painters tape, will ensure straight, crisp lines.
Caulking is sort of like using a pastry bag (if you’ve done it). It requires constant pressure and the correct application, which is achieved by cutting the tip of your canister to a 45-degree angle. Insert the caulk into your gun—make sure you’ve punctured it if your gun doesn’t have a mechanism that does so for you—and take a deep breath.
Using constant pressure on the trigger, go between the taped lines. Don’t worry too much if it isn’t completely perfect, as you’ll be smoothing it out with your finger later, but get it as smooth as you can.
After you finish that up, wet your finger with some of that alcohol or some water and go along the caulked line, pushing it up against the surface while smoothing it out simultaneously. Wipe your finger as you go, as if you let your finger collect too much, it makes the job harder.
Once you’re done, pull off the tape and admire your handiwork.
9. Fix a Drywall Hole
Unfortunately, drywall holes happen. Whether it’s from a door swung open and the knob busting through or some other misfortune, drywall holes are unsightly and nagging.
Luckily, it’s a pretty easy fix. With some specialized tools and material, scrap wood, compound, and sandpaper—and matching paint of course—fixing drywall holes is an exercise in simple geometry.
Using a retractable razor blade, cut out any paper or extra material that’s hanging out or loose.
Use a self-adhesive patch (it looks like metal mesh that can be found at any home improvement store) and affix it to the cleaned out hole. Let it dry out.
During that time, mix up some drywall compound (sometimes called “mud”). Once that’s at a pasty consistency, use a tape knife and spread the compound around on the screen. Make sure that your drywall compound is thick enough that it doesn’t just ooze through the mesh. Cover the patch completely.
Next, add another coat of the compound onto the patch, covering the first coat completely. Using a wet rag, blend the outside of the patch into the surrounding wall, so there’s not a noticeable edge to where the compound ends and the wall begins. Once the compound dries out completely, you can sand, paint and prime it to match the surrounding wall.
10. Save Money and Clean Your Paintbrushes Yourself
Is there anything vinegar can’t do?
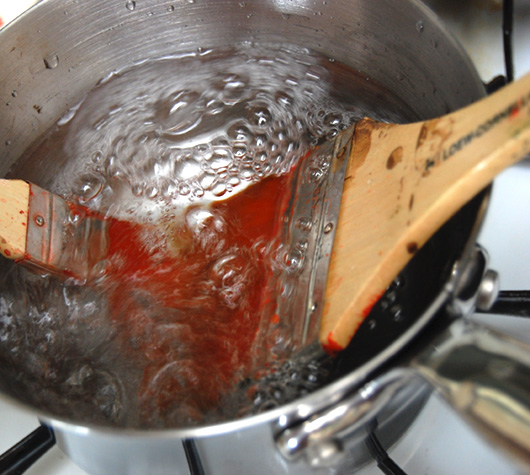
If you’re gearing up for a big paint job and take your brushes out only to find them rigid with dry paint, boil them. In vinegar. Hot, rolling vinegar will disperse the paint and revitalize the bristles.
Get yourself an old, deep saucepan and pour in enough white vinegar to submerge the bristles. The cheap stuff will do the trick just as easily. Rest the paintbrushes bristles down against the rim of the pot (or suspend them so the bristles don’t bend) and boil those suckers for a few minutes. While you won’t see the paint disappear before your very eyes, once the vinegar cools and you wash your brush, the chips will just fall right off. Repeat as necessary.
Oh, and as a bonus trick, line your paint trays with a plastic bag that wraps around the entire thing before you pour your paint. It’ll save it forever. Just be sure the bag is big enough to conform to the actual shape of the tray.
Hopefully these ten tips can help you cultivate a handyman reputation. We tried to hit most every room or at least part of any feasible project that someone could ask for your help. And this knowledge just might help you steer the conversation away from sports stats the rest of us are too busy to care about.