Having a nice place you can be proud of is tough, regardless of income. Requiring it to be done on an average guy's salary feels downright impossible. We're all so sick and tired of seeing these magazine shots of high ceiling, exposed brick lofts with twirly stairs and $5,000 sofas. A Primer reader put it best in the comments, “It's hard to have an amazing place when the ‘bones' of the apartment are so boring.” Let me see if this describes your place: White walls, cream colored carpet, fake hardwood if you're lucky. Outdated lighting fixtures. Ugly appliances.
If you're a man on an average budget, it's easy to feel defeated before you even get started.
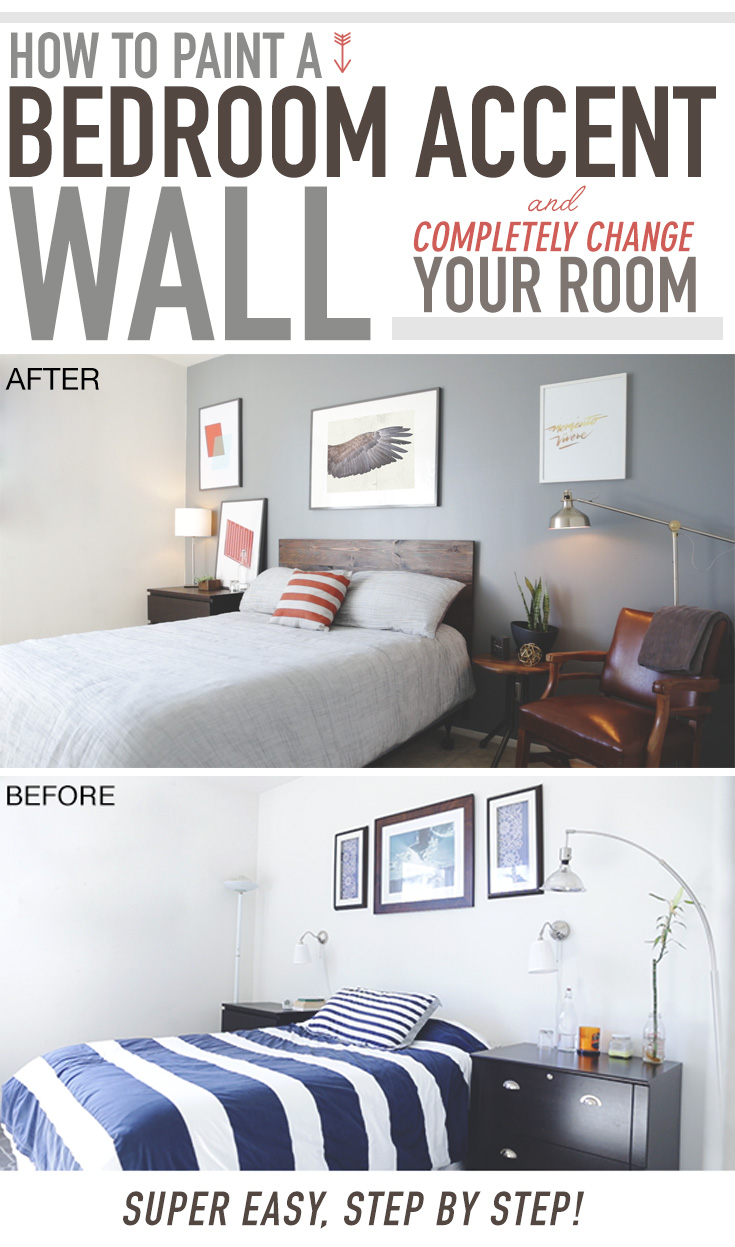
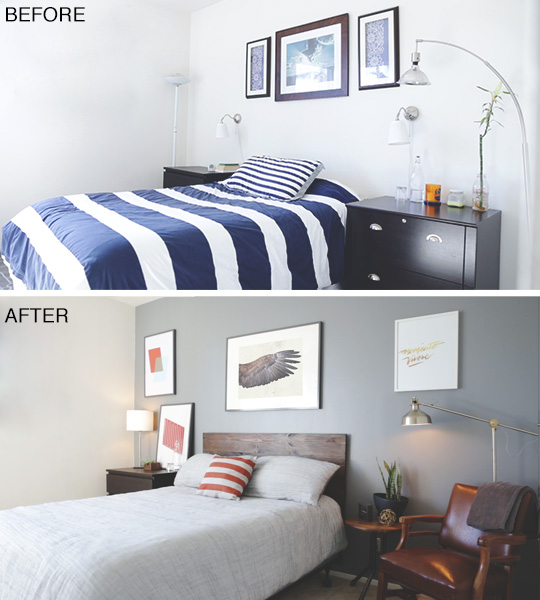
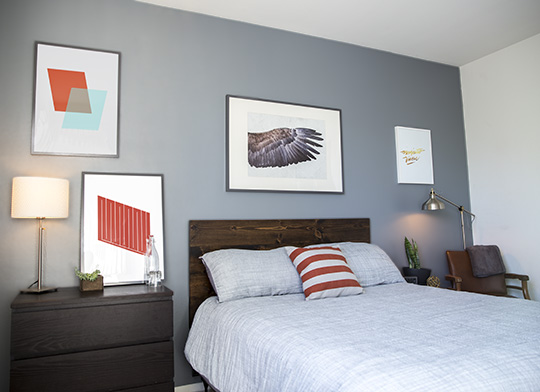
That's why I'm so excited to bring you this new series as a part of The Intentional Apartment. Over the course of a few articles you'll be able to recreate this bedroom EXACTLY, from the wall and headboard, to all the art being available as Free Art Downloads, to a full dissection of each decoration and piece of furniture.
 |
I'm excited to bring you this project in partnership with Lowe's. You can get everything I used right from your local store. Never stop improving.
What is this? |
It isn't true that a square box apartment is harder to make interesting. Rather, unique apartments are just really easy. In this piece, we're going to anchor your bedroom and create a strong foundation to build upon.
To do that we're going to paint an accent wall. An accent wall, perhaps obviously, is one wall different from the rest, intended to drive focus and create interest in the room. It's incredibly effective and the best part is it's one of the easiest things you can do.
If you've never painted a wall before, do not dismiss it as too much work. It is very straightforward and I give you all the details on how to do it like a pro below. Accent walls are the perfect project for guys who live in apartments. Most landlords are okay if you paint, as long as you paint it back before you move out. By only painting one wall we're making the painting and the repainting super simple.
Painting a single wall takes, maybe, 2.5 hours of total work time. Obviously you have to buy the supplies and wait for the first coat to dry before adding the second, but actual work time is negligible, and the result will change everything.
A quick video overview to show you just how easy this project is!
Step 1: Gather Your Supplies
Question numero uno is: What color do you want to paint your wall? There's no wrong answer here; it depends on your personal style and what you want the mood or feeling of the room to be. If you're looking for a modern take, consider grays of any shade, tans, or subdued blues. Especially since this project is for a bedroom, you want the color to enhance the calmness and homey feel. If you'd like to be more adventurous, living rooms and kitchens allow for brighter colors.
I chose multiple gray swatches to bring home. Ideally you won't pick a swatch and buy the paint in the same trip. Take a swatch home, see how it looks in the light of your bedroom. Often times, especially with grays, they can look cooler or warmer (that is, more blue or more orange) depending on the light amount and source, as well as the other colors in the room. For example, I had used some left over gray paint from the wall and painted my guest bathroom door. The door is blue. No doubt about it. But the wall is clearly gray. Interesting how that happens.
After testing the swatches in the bedroom, I decided to go with a gray shade called “Sofware” by HGTV Home by Sherwin Williams. I liked this paint specifically because it includes a primer. Since our color is a mid-shade, I wanted a paint that could offer full coverage and consistency in a primary coat and a quick follow up coat.
Latex wall paint comes in 5 sheens:
- Flat – No shine, reflects little light and hides imperfections. As a wall is painted over and over again, the surface becomes textured. The worse the texture and the shinier the paint, the more this is apparent from farther away. However flat is harder to clean. Imagine paper vs laminated paper.
- Eggshell – Smoother than flat and reflects more light. A common choice for walls.
- Satin – Shinier, and thus more washable. Often used in kitchens, bathrooms, and children's rooms.
- Semi-gloss – Reflects 30-50% of light that hits it and is durable like satin.
- Gloss – Very high shine and reveals all surface imperfections, however it's very durable.
Having painted a few other walls in my day I decided to go for Eggshell this time. I'm very happy with how it came out, and it doesn't emphasize the texture and imperfections of the wall.
You'll need to pick up a gallon of paint for a wall. My wall is 15′ by 8′ and you can ask the pro who is mixing paint how much you'll need. The gentleman who helped me at Lowe's was very knowledgeable about proper tools and paint specifics.
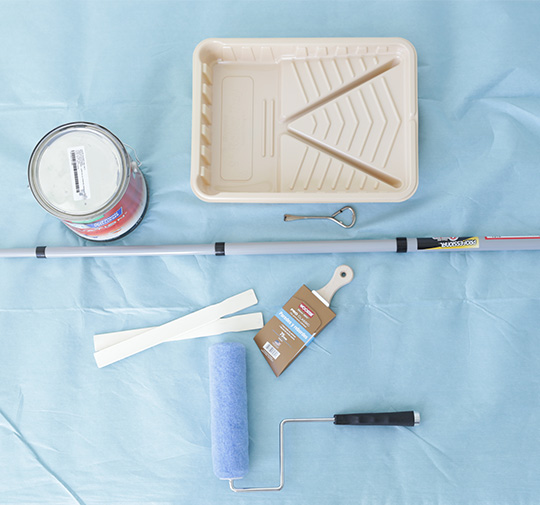
The tools you'll need to complete the painted wall are pretty minimal.
- Paint, I used “Software” from HGTV HOME by Sherwin Williams you’ll only need a gallon – $29
- Paint tray – $2
- 3” Angled paint brush – $10
- FrogTape Multi-surface Painter’s Tape 1.88” width – $9
- 5 Foot adjustable roller pole – $5.88
- 4ft x 15ft canvas alternative drop cloth – $9
- You can buy plastic ones for less but when paint gets on them it doesn’t absorb at all so it may get on your shoes or other places you don’t want it. Pro’s use canvas drop cloths, which you can upgrade to, but they cost more.
- 9” Paint roller – $3.87
- Paint rollers come in different nap lengths, which is how long the fibers are. The more textured a surface the longer nap you need. For a normal wall 3/8″ is recommended.
- Putty knife – $3
- Lightweight spackling – $4.28
- Paint can opener – $.50
- Screwdrivers work, but pro's don't use them. Why mess up a good screwdriver over a matter of $.50?
- Swiffer or rag
Total Cost: $76.53
Step 2: Prep
We’ll begin by moving furniture along our accent wall out of the way and taking down any picture frames. Since we’re only doing one wall, there’s no reason to remove all of the furniture from the room, unless that makes it more convenient. Our drop cloth is only 4 feet deep, and as long as you’re being intentional, there won’t be any paint beyond that. You can simply stack your bed along the opposite wall and slide any other furniture out of the way.
Remove any faceplates of wall outlets along the wall.
Step 3: Clean the Wall
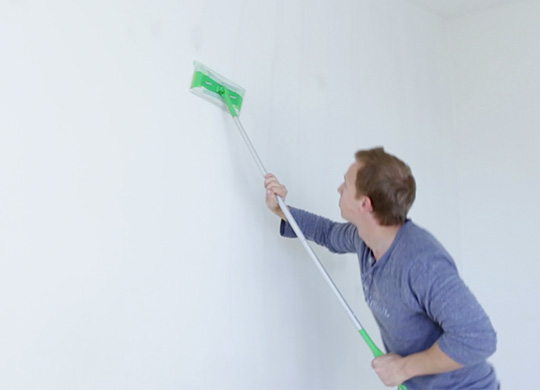
Believe it or not, walls can collect quite a bit of dust. We need to give it a quick wipe down to make sure our new paint adheres as best as possible, as well as making sure we don’t get clumps of dust or other debris stuck to our painted wall.
The quickest way to do this is with a Swiffer. Simply go top to bottom moving across the whole wall. One pass is plenty. If you don’t have a Swiffer you can use a wet rag.
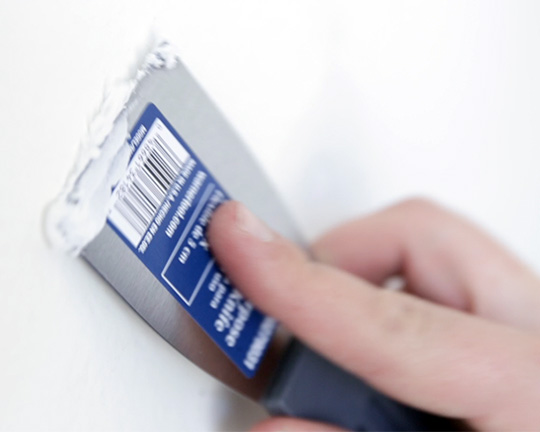
If you have any larger holes in the wall from hanging things, you’ll need to fill those in with spackle prior to painting. Simply load some on your putty knife and wipe it across the hole. You can do a few passes to completely fill and level the hole. You don’t want too much putty on the wall around the hole because that may appear as a smooth spot after painting if the wall already has a bit of texture.
Step 4: Masking
In woodworking, sanding is one of the most important steps to get a beautiful, professional finish. It’s also the one beginners like to skip over quickly because they’re excited to move on. Similarly, masking accurately and correctly is the most important step for getting hard, straight lines, as well as making sure you don’t get paint anywhere you don't want it. It’s much easier to over-mask than it is to try to get paint off of someplace it doesn't belong.
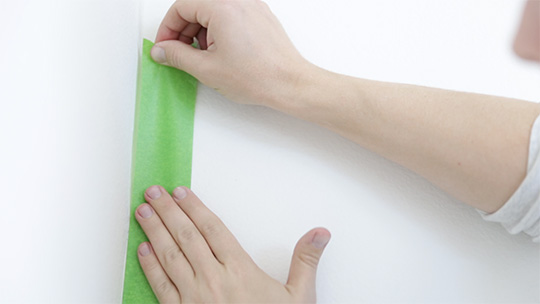
It’s important not to skimp on what kind of masking tape you use. I like to use 1.88″ wide FrogTape. It’s about $8 for a roll but it’ll last you longer than this project. Better masking tape offers a few advantages. It sticks more thoroughly so that paint doesn’t find it’s way underneath. On walls that have been painted over and over like those usually found in apartments, the surface becomes quite textured. Lower quality tape will only stick to the peaks and not the valleys. The result will be an uneven painted edge.
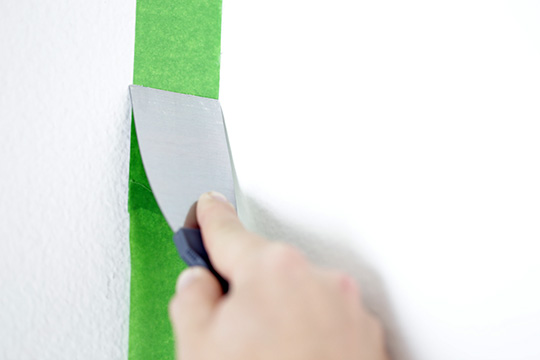
You want to use short, overlapping strips. This makes the line as straight as possible. Mask both walls next to the accent wall, the ceiling and the baseboard on the floor. Once the tape is down, run your putty knife along the edge to get it properly seated. Don’t forget to mask any outlets on the accent wall as well.
Step 5: Cutting In
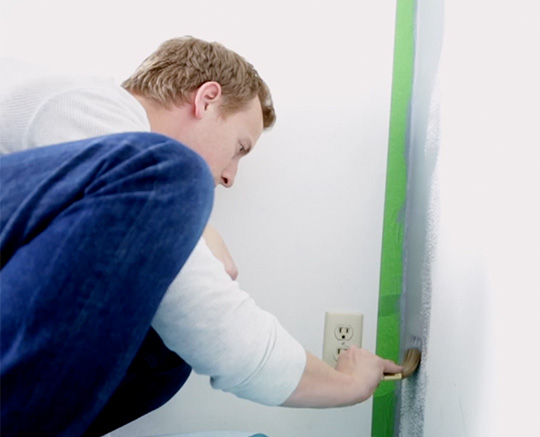
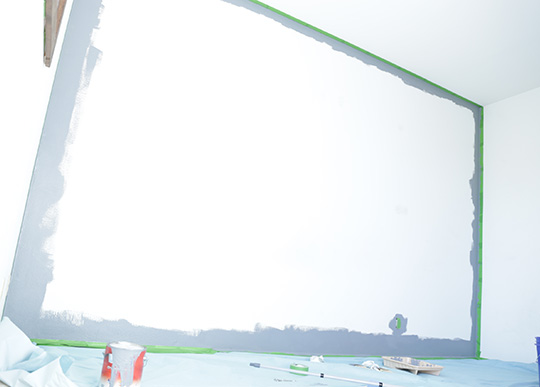
Using paint rollers allows for fast and even painting over large areas. However, they can’t be used for fine work. That’s why we’ll need to outline the wall with a paint brush first, a process known as Cutting In. This will let us roll the rest of the paint very quickly.
Begin painting a 3-5” outline around the room. Start away from the tape, and work outward so that when you get to the tape there’s only enough paint on the brush to cover the wall and not a lot of excess that could seep under the tape. If you were to ever paint an entire room, you would do this wall by wall. Cutting in on all the walls before you start rolling would leave noticeable lines because the paint around the edges will have dried first.
Step 6: Rolling
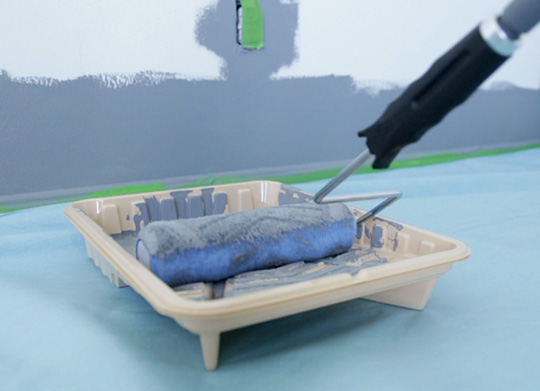
Once the full wall is outlined, we can begin using our paint roller. Pour a bit of paint in to your paint tray. Dip the roller in the deep end of the tray and roll it over the ridges until the roller is completely covered and excess paint has been removed. The trays include drainage trenches for the excess paint to flow back into the deep end. Having too much paint on your roller can result in uneven painting, greater likeliness of dripping or splashing, as well as wasting paint. Having said that, it’s also a common mistake for beginners to not use enough paint. That results in a dry roller creating a textured finish on the wall. If you’re mindful of not using too much but also keeping your roller wet, you won’t have any trouble.
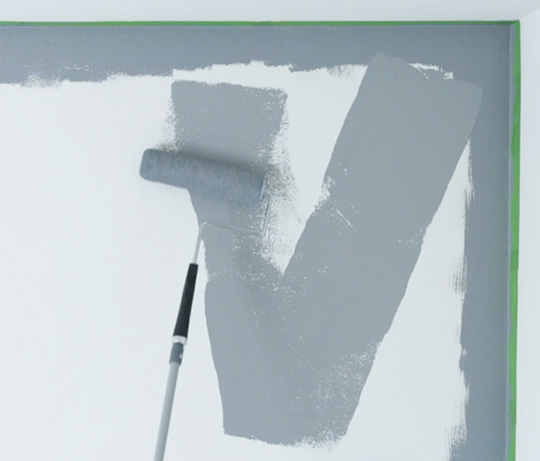
Begin rolling paint onto the wall, top to bottom, in a series of W shaped strokes. Do this in 3’ x 3’ sections. This process blends all of our strokes together, whereas simply painting in straight lines top to bottom can result in a striped appearance once dried. The W strokes shouldn’t be any wider than one arm length.
Reload the roller and cover only as much wall as you can while the roller is wet. We’re using a technique professionals call “working to a wet edge,” where we always overlap our last strokes after reloading the roller. This prevents streaking, and ensures even coverage across the wall. Before reloading the roller, go back over the recently painted section, smoothing the strokes to cover up lines and roller tracks.
As you finish a section, slowly lift the roller off to avoid leaving end marks, which are puddles on the wall where the roller stopped painting.
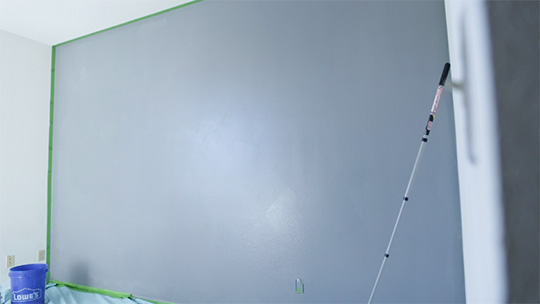
Since we’re doing a dark color, it’s best to do two coats. After you cover the wall with the first coat, wait 2-4 hours for the first coat to settle and start drying. Simply repeat the process for the second coat, which is always much faster than the first.
Step 7: Removing the Masking Tape
Allow the paint to dry for several hours, and then remove the masking tape. We want to start pulling the tape before the paint fully dries so that we get crisp, straight lines. Doing so after completely drying can result in small chips around the edges.
All Finished!
That's all there is to painting the accent wall. Up next in our bedroom wall series:
- How to make that beautiful, minimalist headboard dirt cheap
- Free Art Downloads for ALL of the prints on the wall
- An analyzation of the different design elements to achieve the look, which combines several styles like rustic, vintage, and Mid-century Modern for a completely contemporary feel.
Stay tuned! Can't wait to share more with you.
If you liked this post, please share it. If you do this project yourself, I'd love to hear about it and see photos! Share them in the comments.




![It’s Time to Begin Again: 3 Uncomfortable Frameworks That Will Make Your New Year More Meaningful [Audio Essay + Article]](https://www.primermagazine.com/wp-content/uploads/2025/01/begin_again_feature.jpg)
