

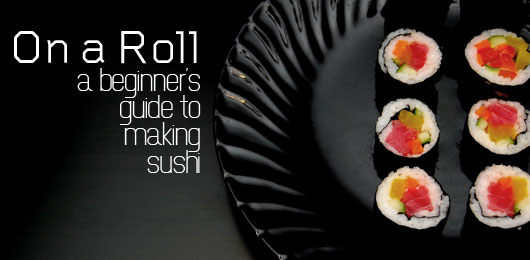
Who would have thought raw fish could entertain and impress? Learn the basics of creating an inexpensive and unique dinner with sushi.
By Pyung Kim
As a second generation Asian-American, I grew up feeling the influence of two seemingly disparate cultures. And if I've learned anything significant from all those years I spent grappling with a dual cultural identity, it's this:
People Love Sushi
Doesn't matter who you are or where you're from. No one can deny that sushi has exploded in popularity in the U.S. over the past two decades and by now, has fully established itself in Western fusion cuisine. Nowadays, a little spicy tuna roll is as common as pizza or tacos.
If you don't love sushi, you probably haven't really tried it. And I've found that anyone who hasn't had it is more than willing to try it. (Well…maybe not your baby-boomer uncle Hal from back home who doesn't know how to use chopsticks and has only experienced raw fish in the form of a juvenile college prank…)
Okay, so pretty much everyone loves sushi. But guess what? No one knows how to make it. People have to get their fix from Japanese restaurants and sushi bars, which can often be overpriced. Truth is, you don't have to be some kind of master sushi-chef to make your own sashimi rolls. You don't even have to be a sushi-sous-chef (say that three times fast). Making sushi is actually pretty simple. And if you have all the right tools, it's less expensive. Imagine hosting your very own sushi party, impressing friends with a huge variety of expertly crafted homemade sushi. Maybe you could even get Uncle Hal to come over and try it.
What Does it All Mean?
“Sashimi”, in the culinary context, refers only to the raw fish component of the sushi. Generally, fish must be frozen, stored, and handled properly to make it suitable for eating raw. Don't assume that any fresh fish you find at the market is safe to eat raw. This means you should only use seafood that is labeled “Sashimi Grade.” Some larger grocery stores may carry sashimi grade fish, but you'll certainly find it in the seafood section of your local Asian market.
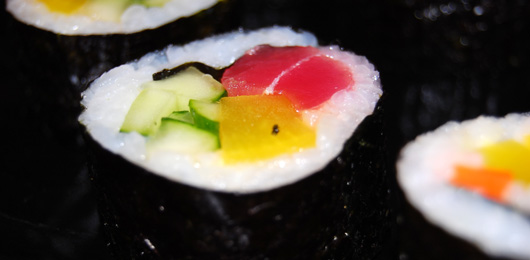
“Sushi,” of course, is the actual bite-sized final product that we'll be making – this includes the rice, vegetables, and the sashimi itself.
Here's What You'll Need:
(Keep in mind that all of the following can be found at your friendly neighborhood Asian market)
- “Sashimi Grade” fish – Like Tuna, Yellowtail, Salmon, or Mackerel.
- Vegetables – Cucumber, Carrot, Avocado, Pickled Radish, Steamed Spinach, Asparagus…really, whatever you want in your sushi.
- Sushi Rice (2 Cups) – You'll need short-grain Asian white rice. The starch content of Asian rice makes it sticky when cooked, so it clumps together. Non-glutinous or Western long-grained rice won't work since it's too dry in texture.

- Plain White Sugar (2 Tablespoons)
- Salt (2 Teaspoons / To Taste)
- Rice Vinegar (3 Tablespoons) – Any mild vinegar made from rice or rice wine will do, preferably Japanese rice vinegar.
- Seaweed – Sushi is rolled with thin paper-like sheets of seaweed called “nori.” You want the larger sheets that are about 8″ x 7″. At the store, you'll find it in packages, pressed and roasted, ready-to-eat. And no, you cannot just use any old algae you scraped off the bottom of a pier. That's gross.
- Soy Sauce – Kikkoman brand Japanese soy sauce is most commonly found in restaurants and grocery stores, but any type of dark soy sauce will work. When you make your trip to the Asian market, watch out for a condiment called “Ganjang”, which is a paste made from fermented soy and is sometimes referred to as “Korean soy sauce” – this is not what you're looking for. Also, watch out for Korean drivers. Just kidding, that's only a stereotype.
- Wasabi – A green condiment made with horseradish and mustard seed. This stuff is very spicy, so you only want to serve a small dollop on the side to accompany each serving of sushi. Some people like to mix about a pea sized amount of wasabi into a small dish of soy sauce to use for dipping. Others argue that it's best to keep the soy sauce and wasabi separate, saying that the soy-wasabi mixture masks the flavor of the fish. You may also find wasabi in a concentrated form which requires you to add water to turn it into its ready-to-eat paste consistency – such as a powder. I don't think I need to tell you not to get any of that in your eyes…
- Ginger – Shaved pickled ginger called “gari” is served in small amounts on the side to cleanse the palate. I know, it sounds pretentious. But this is sushi we're talking about! It's supposed to be fancy!
- A Very Sharp Knife – There are special knives designed specifically for slicing sashimi, but really, any sharp kitchen knife will get the job done. So if you're using a Japanese Hocho knife, chances are, you're an actual sushi chef, or you're just being a show-off.
- Shamoji – A rice spatula used in the preparation of rice and also to spread cooked rice evenly onto sheets.
- Bamboo Mat – A rectangular mat made with strips of bamboo. You'll use this to roll the sushi. If you can't find a bamboo mat, you can use a sheet of tin foil. Really. I saw it on “MacGuyver” once.
Here's What You Do
You'll need to rinse the uncooked rice in cold water. There are several ways to do this, but here's the simplest method: With the rice in a large pot, fill the rest with water and massage the rice with your fingers, fistfuls at a time. Drain and repeat until the water is clear. You'll notice the water is cloudy at first, but it becomes clear after about 4 changes. Rinsing the rice before cooking is not absolutely necessary, but it removes the talc or starch that has been added in packaging (to prevent water absorption) and gives the cooked rice a presentable sheen. Remember – sushi is about presentation, too. Let the rice soak in its final change of water (which should be clear) for about 30 minutes.
Onto the seasoning. While the rice is soaking, heat the vinegar, sugar and salt in a saucepan on medium until all the sugar and salt has dissolved, but be careful not to boil it. Once these are dissolved into the vinegar, take the mixture off of heat.
Now, time to cook the rice. We're basically steaming our rinsed rice in equal parts water (2 cups water for 2 cups rice). Cook over very low heat covered with a lid at all times. You'll know the rice is done when the water has evaporated. This process is much easier with a rice cooker, which has only one setting and turns off automatically when the rice is done. If you're Asian, you probably still have the one mom gave you when you went off to college. If you're not lucky enough to have an Asian mom (but you love Asian cuisine just as much) you might want to invest in a rice cooker. They run from $40 to over $100, mostly depending on size.
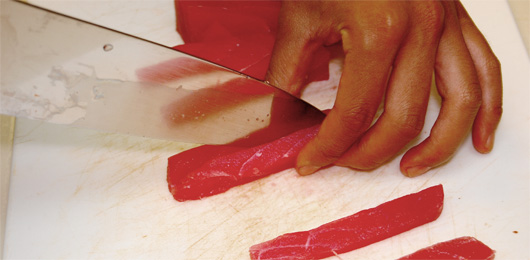
While the rice is cooking, we'll slice the sashimi and vegetables. You want everything to be in thin, long strips. I mean really thin – no bigger than half an inch thick. Before you slice the sashimi into strips, you may have to trim it down a little here and there to turn it into a manageable block. Basically, you want it all to look like french fries when you're done.
Take the cooked rice out of the pot and put it into a large mixing bowl. You're now ready to combine your liquid vinegar seasoning with the rice. The goal is to add the seasoning while the rice cools. Using your shamoji (the rice spatula thingy), gently spread open the rice in your bowl as you slowly pour the mixture in. This seasons the rice evenly while exposing it to cool. Don't be too forceful with the shamoji. Try to mix with a gentle spreading and folding motion in order to keep the rice grains intact. We're only seasoning the rice here, not turning it into a paste. Who wants mushy sushi? I don't.
Some people like to fan the rice to help cool it during the mixing process. Finally! A chance to use that decorative Asian fan you have lying around!
When you're done mixing and the rice is at room temperature, we're ready to roll! (Sushi, that is.)
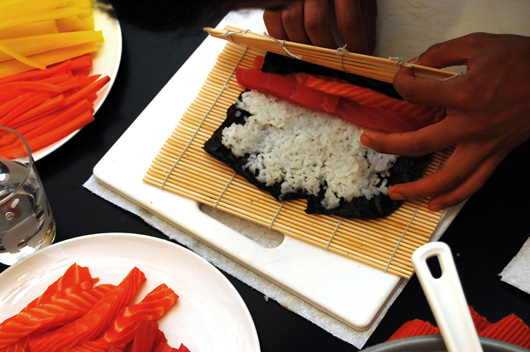
Place your bamboo mat on a counter or cutting board so that the ribbed lines run horizontally from you. Take out one sheet of nori. See how one side is a little shinier? You want to lay down that sheet of nori on top of the bamboo, shiny side down. (It might help to put a sheet of Saran wrap in between the bamboo and the nori to help prevent sticking in case any rice gets in there.)
Now, using your shamoji, spread a thin layer of rice on top of your nori sheet. If you use too much rice, it'll be difficult to roll. And leave about a half-inch margin at top of the nori; on the side furthest from you.
Next, arrange one or two strips of sashimi with one or two strips of vegetable horizontally, near the center. This is where you get to be creative. Salmon and tuna roll with asparagus anyone? Or how about tuna with a little avocado and cucumber?
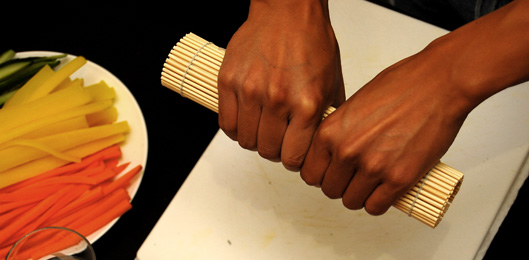
Once you've lined those strips down, dip your fingers in water and wet the top margin of nori. This will help the edge adhere later. Now, start rolling your creation from the bottom up. Here's the tricky part: You want to roll by curling up the bamboo mat while peeling it back bit by bit as soon as it is about to touch the rice. You can't just roll it all up with reckless abandon – otherwise, the bamboo mat will get spiraled in there with the rice. Once it's all rolled up (with the bamboo mat wrapped entirely on the outside), firmly grip the bamboo log with your hands several times to tighten the roll. Careful, you don't want to grip it so hard that your avocado filling gets squeezed out, but you do want the roll tight enough to maintain its integrity.
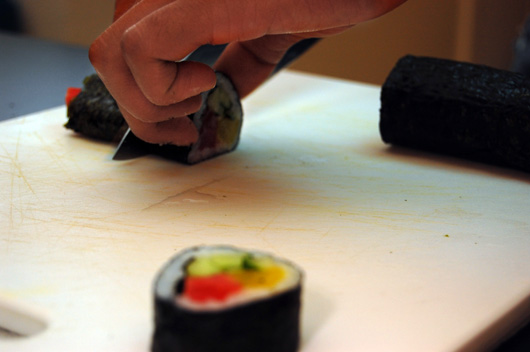
When you take your roll to the cutting board, slice it in half first. Then cut the rest of your pieces as big or as small as you'd like. Generally, roll slices are only a fraction of an inch thick. If you're making a lot, it might help to wet the blade occasionally while you're cutting.
Presentation
Sushi looks best on small, minimalist dishware. Many restaurants will even serve sushi in trays or small wooden cutting blocks. Some people throw away the ends of the roll because they're not as uniform looking, but I like to serve that as well. I place them on the plate, end-up, at the center of the arrangement. If you've done your rolling and cutting properly, you shouldn't be ashamed of your ends. They should still be presentable and will serve to accent your sushi arrangement. You don't have to treat them like bastard stepchildren.

If you're feeling extra creative, try using another ingredient as your sushi wrapper, like spring roll wrappers. Another alternative to nori seaweed is eggs. That's right. I said eggs. Instead of rolling your sushi with a sheet of nori, you can use what is essentially a cold, paper-thin omelette as the wrapping, which you can prepare on a rectangular omelet pan.
Eternal Sushi of the Spotless Mind
Sushi doesn't always have to be prepared with raw fish – there are several varieties that feature fish eggs or cooked shrimp. California Rolls use imitation crabmeat. Philadelphia Rolls compliment their vegetable and/or sashimi components with cream cheese. If you haven't already noticed, one of the great things about sushi is its versatility. You don't even have to use any seafood at all! The vegetarian options are practically endless. Your rolls could consist solely of any combination of cucumber, carrot, avocado, asparagus, radish, spinach…you get the idea. With sushi, you're limited only by your imagination – hell, I've even seen hot dog sushi served at 4th of July parties. No joke. And it's actually good!