


For a lot of young guys a headboard seems superfluous. Unnecessary. An added expense. As useless as all those pillows your girlfriend has on her bed.
But the reality is, a bed is a piece of furniture. It has multiple parts: A mattress and box spring, a frame, and a headboard. Without the headboard it's just a mattress. Like couch cushions without a couch. A bar stool without a bar. A nice TV sitting on the living room floor.
If you're frustrated by the barren landscape that is your bedroom and you want to start making it look intentional, a headboard is the number one place to start. Even before you hang any pictures. A headboard is a huge focal point – it grounds the room and sets the tone. The style of it establishes the look of the rest of the space.
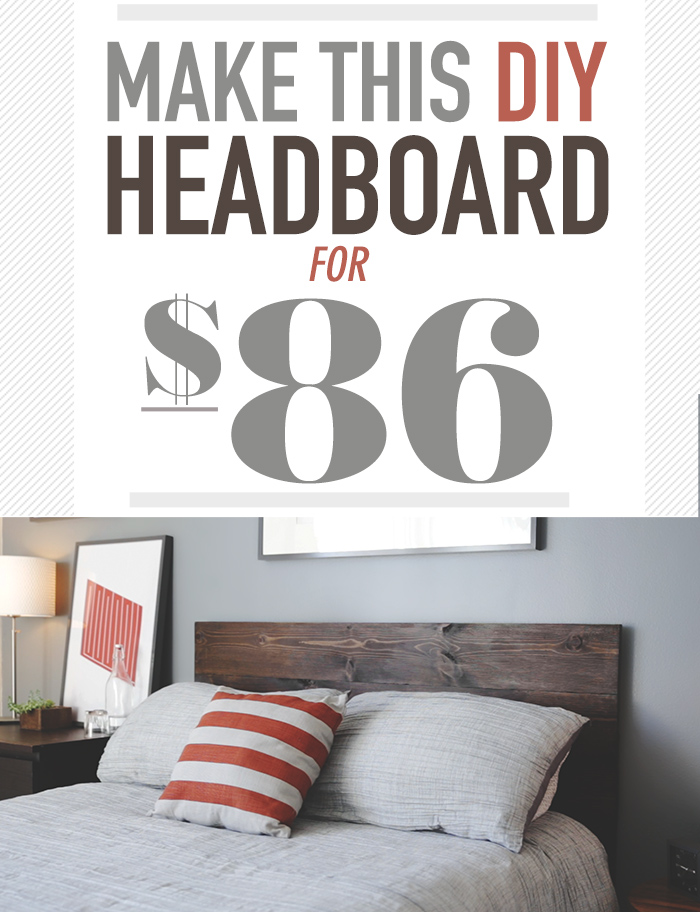
I'm super excited to bring you this DIY wood headboard project today. It's dead simple but it will completely change the look and feel of your bedroom. Even if you've never drilled a hole before, I'll walk you through the complete process, from start to finish. This whole project takes less than 2.5 hours, not including drying times. So pick up the supplies on Saturday and you'll have a whole new bedroom by Sunday morning.
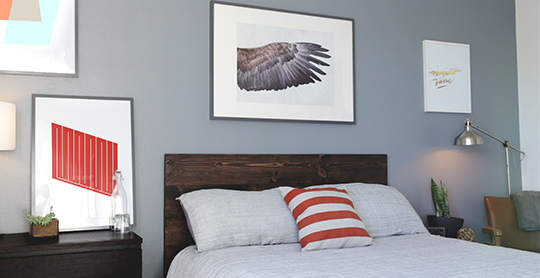
This is part 2 of our series on creating the above bedroom from scratch. Part 1 was a how-to on painting an accent wall, which is also dead simple. Stay tuned, you'll soon be able to download all of the art you see on the walls FOR FREE, and I'll dive into the deep end of interior design and explain why I chose the things I did so you can either recreate it for your own place or start putting the ideas to work to make something of your own.
There are two types of headboards. Some have structural pillars and screw onto your bed frame. These are a classic design but there's one big problem, for which I'm sure you can guess. Headboards that are attached to bed frames, move with the bed. So any little movement and the headboard bangs into the wall.
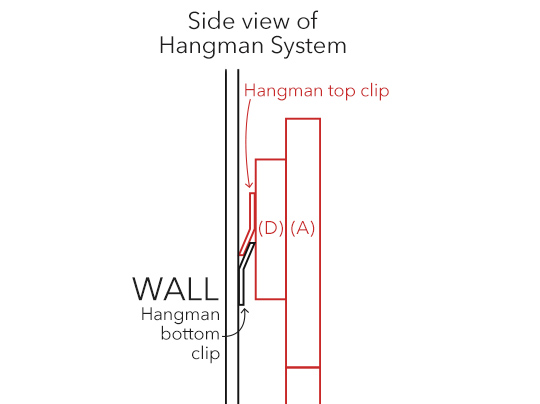
That's where the other type of headboard comes in. Did you know any headboard you've ever seen in a nice hotel was actually attached to the wall, not the bed frame? This completely mitigates the problem, and it doesn't take a lot of brainstorming to wonder why hotels don't want a bunch of free flowing headboards banging around. So that's the type of headboard we're going to make. A very simple design that will hang freely on the wall behind your bed. Even better, you won't need to drill massive holes or screw into wall studs.
To hang the headboard we're going to use a picture hanging system that's used to hang large frames and heavy mirrors. It consists of two metal clips, one attached to the wall facing up, and one attached to the headboard facing down. Simply hook the two together and you're done. The 18″ Hangman System we'll be using is rated to hold 200 lbs, but our headboard is only 29 lbs so we shouldn't have any problems.
Just to prove how super simple this DIY project is, watch this cool video overview we did:
I'm excited to bring you this project in partnership with Lowe's. You can get everything I used right from your local store. Never stop improving.
What is this? |
How to Make a Wood Headboard
Step 1: Measure
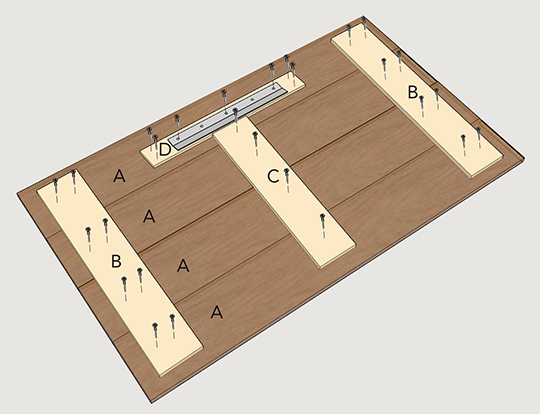
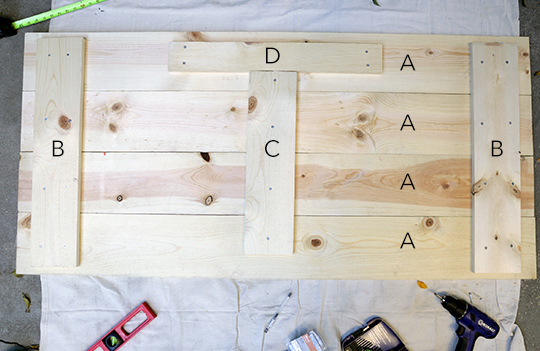
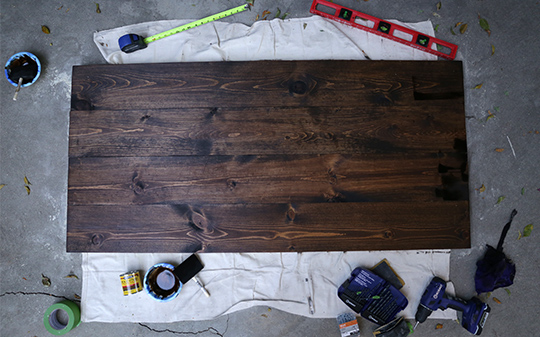
The design of the headboard is incredibly simple. We have four long boards (A) that we can see from the front, three vertical support boards that attach the long boards together (B and C), and one horizontal support board (D) that our Hangman System clip will screw into.
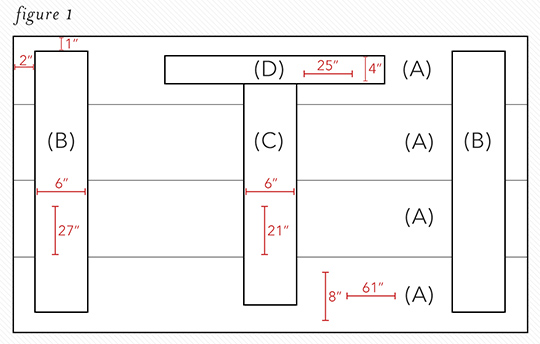
To get started, we need to figure out how long our headboard should be. This is based on your mattress size. I have a queen, so I measured the width of the mattress and added an inch so the headboard would be slightly wider. That gave me the measurement of 61”, so we need four 1” x 8” x 61” boards. (This means we’ll need 6’ boards cut down to size.) Those are marked on the diagram as (A).
We also need two 1” x 6” x 27” (B) boards and one 1” x 6” x 21” (C) vertical support board that all attach on the back. These 1” x 6” boards come in 48” lengths, so board (C) is just one of the leftover pieces after the (B) boards are cut. Board (C) is slightly shorter to allow room for the horizontal support board (D).
Regardless of what size bed you have, everything except for the length of the (A) boards will be the same. However, if you’re making one for a twin size bed, you will either need to shorten the length of horizontal board (D) or have the distance between the edge of the (A) boards and the (B) boards be less. Neither one is a hard adjustment and will be apparent when you start lining your boards up.
Step 2: Get Supplies
I picked up all of my supplies at Lowe’s. They’ll even cut the boards for you so this project really comes down to drilling holes, screwing screws, sanding, and staining. Like I said, dead simple!
Here's the complete shopping list
- Wood
- 4 x (A) = 1” x 8” x 6’ common board cut down to 61”, $8.87 / each, $35.48
- 2 x (B) = 1” x 6” x 4’ common board cut down to 27”, $4.07 / each, $8.14
- 1 x (C) = 1” x 6” x 21”, this is the remainder of one of the (B) boards after it has been cut
- 1 x (D) = 1” x 4” x 4’ common board cut down to 25″, $2.15
- 100 count #8 1.25” flat head wood screws, $5.98
- Minwax Polycrylic satin polyurethane, $9.47
- 4” foam brush, $1.28
- Minwax wood stain, espresso, $4.77
- 3M 180 grit sandpaper, $3.97
- 3M 80 grit sandpaper, $3.97
- 18” Hangman Picturing Hanging System, $10.88
Total cost: $86.09
If you don't have already, you'll also need:
- Power drill
- I use the Kobalt 18v Cordless Drill, $99, which has more than enough power for all of Primer's DIY projects, the batteries charge in only 30 minutes, and it comes with a 5 year warranty.
- Drill bits
- 3” Bristle Paint Brush, $4.17, if you did the accent wall project, you can use one of your cleaned brushes from that.
- Kobalt 25’ Tape Measure, $10.98
- 3M Rubber sanding block, $5.47
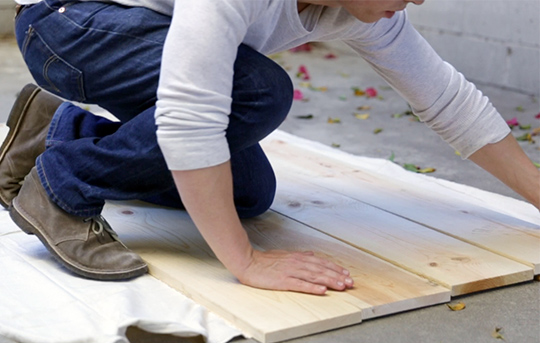
We’re using common boards for this project, which are incredibly cheap and easy to work with. Start by looking for your four horizontal boards (A). You want these to be as straight as possible. A good way to check the straightness of a board is to stare down the top edge like you were looking through the sights of a rifle. This will help you determine if the board is too warped to use. Find boards that have markings, grain, and knots that you like, since these will be visible.
Once you find four straight ones that you like, lay them on the floor and push them up against each other to see if there’s a good fit. If there are gaps between two boards, you can try flipping one of them over or rearranging them until they're tight.
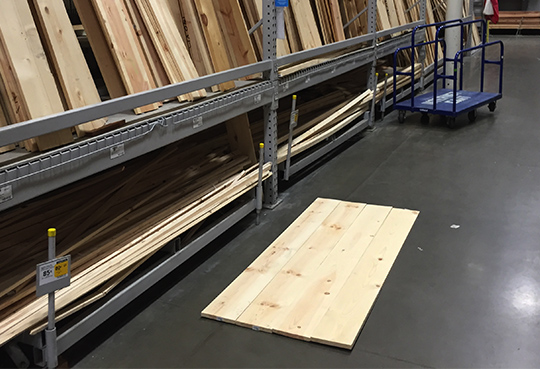
When you have your four boards in order, number the ends so you know which order they go in when you get home. Mark both ends, since we’ll be having these cut, you don’t want to mark only one end and lose your numbers.
Pick out your two 1” x 6” x 4’ (B) boards and one 1” x 4” x 4’ (D) board.
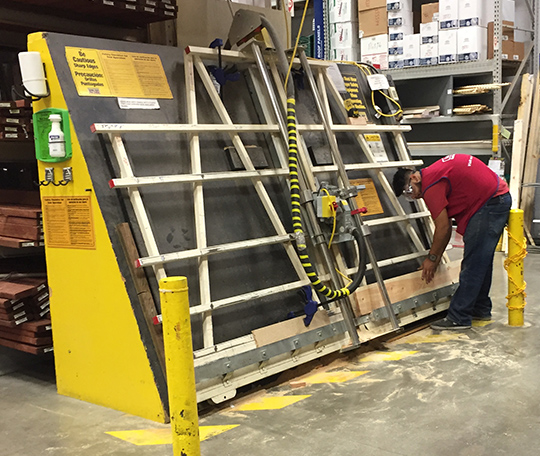
Head over to the cutting station in the back of the store and have one of the Lowe’s employees cut your boards for you. You may be tempted to do the cuts yourself as part of the fun of the project, but honestly it’s so fast when you have it done at the store, it really isn’t worth it.
Step 3: Assembly
Head back home and lay out your four horizontal boards (A) in the order you arranged them on the floor of the store. Make sure that the ends all line up flush.
Marking the (B) Vertical Boards
With the four horizontal (A) boards laying tightly together, lay one of the (B) boards across the four A boards. We want to position it so it’s 1” down from the top and 2” in from the side:
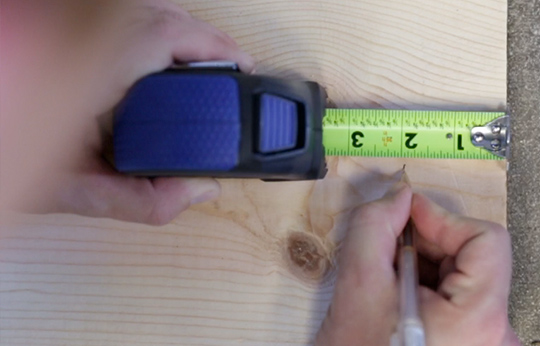
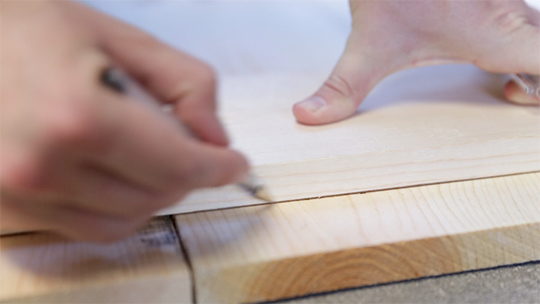
Mark the top and side edge of the (B) board on the first (A) board. Go down to the last (A) board and again measure in 2” from the side and mark it. With the (B) board lined up with your top and bottom marks, you can now draw a line down the edge to ensure it’s straight while you drill your holes and fasten your screws.
Pilot & Clearance holes
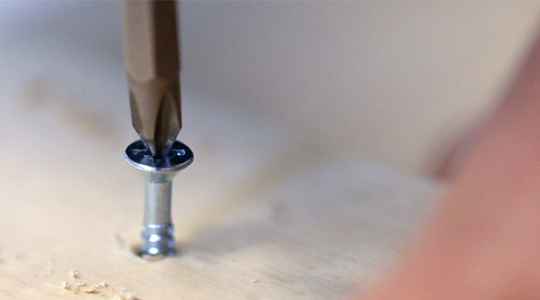
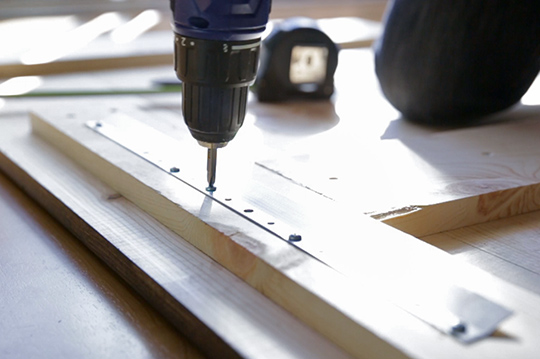
We’re going to use two #8 1-1/4” screws on each end of the (A) boards, as you can see here:
This headboard has a clean front, meaning there are no visible fasteners. For each screw into the (B) boards we’re going to drill two holes, a pilot hole and a clearance hole.
You’ve likely heard of pilot holes before. These are holes slightly smaller than your fastener drilled first to keep the boards from splitting.
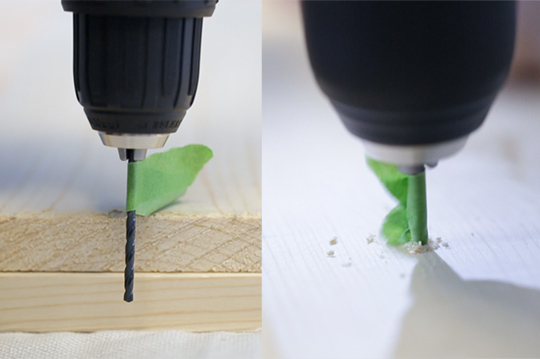
We’ll be drilling pilot holes through both (A) and (B) boards at the same time. To choose a proper drill bit for your pilot holes, hold the bit in front of your screw: The bit should only be as wide as the screw shank, you should still be able to see the screw threads on either side.
We want to make sure we don’t drill too far and go out the front of the (A) boards so insert your bit into your drill and hold it next to the edge of the (A) and (B) boards. Use a piece of masking tape to mark how far down you need to drill
Drill your first pilot hole through (B) into the first (A) board. Now we’re going to drill the clearance hole. Clearance holes are drilled through the board we’re trying to attach, in this case (B). Clearance holes are as large as the screw, so that the screw can easily slip through board (B) and tighten into board (A). This allows the head of the screw to pull board (B) tight against board (A). If you only drilled a pilot hole, there would be friction against both boards when screwing in the screw and that could cause a space between the boards or worse, strip your holes and your screw.
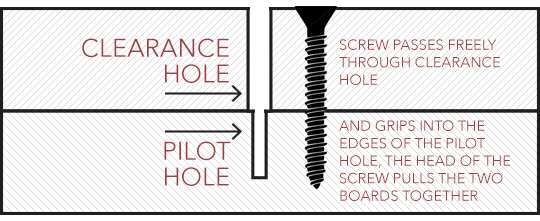
With the larger bit in the drill, enlarge the pilot hole in board (B) only. If you go into board (A), the screw won’t have anything to eat into. You can use another piece of masking tape on your clearance hole drill bit to guarantee that you don’t go too far.
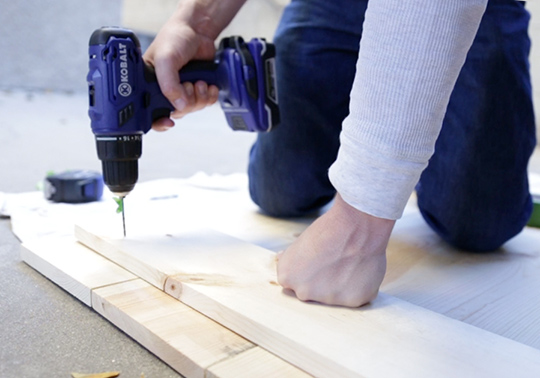
With both the first pilot and clearance holes drilled, screw in your first screw. Now we’re going to hop down to the last (A) board. Make sure it’s still straight along the lines you drew and repeat the pilot hole and clearance hole process. Insert screw.
Now that our first (B) board is attached straight, we can go back and drill all of our holes and insert all of our screws. We want two screws positioned next to each other per (A) board, per the graphic above.
With all eight screws in the first (B) board, repeat the process for the second (B) board on the other end.
Next up is horizontal support board (D). This is a 1” x 4” x 25” board that our Hangman System will attach to, which then attaches the headboard to the wall. We want to center board (D) within the first (A) board; since it’s 25” and the (A) board is 61”, that means we have to measure in 18” on either side. Drill two vertical pilot and clearance holes on each end and insert screws.
Finally, we’ll attach the last vertical support (C). We only need one screw for each (A) board. This piece gives the headboard rigidity.
Boom! Most of the work is now done! Now we simply sand, stain, protect, and hang!
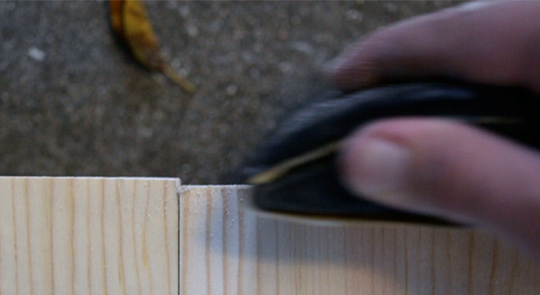
Step 4: Sanding
Flip the headboard over. We’re going to do two sanding passes, first with 80 grit and then with 120 grit. The lower the number, the courser the sandpaper is. You want to start with a courser sandpaper to get any splinters and larger imperfections off. The second pass with the 120 grit sandpaper will give it a smooth, professional finish. (For furniture projects that may get touched a lot like tables, you can follow up with a pass with very fine 220 grit for a buttery soft finish.)
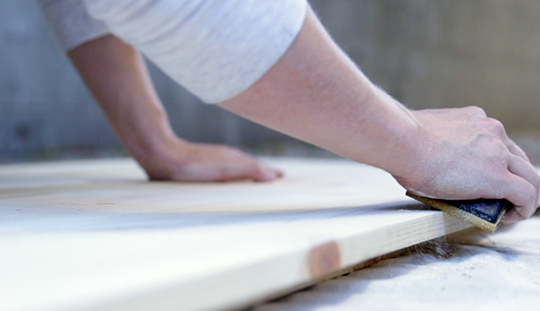
When sanding, you always want to sand with the grain as much as possible. If you sand against the grain you can introduce marks that will become apparent when you stain it.
Don’t forget to sand the ends of the boards, since these are already rougher than the faces when you buy them. If any of your boards are slightly longer than the others you can work to smooth them out to make it less noticeable.
Step 5: Stain
This is the step where it really begins to look like a piece of furniture, and I guarantee you’re going to be excited when you see it.
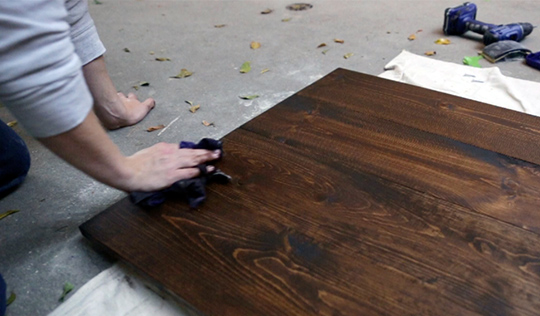
Staining wood is a ridiculously easy process. Wipe off all the dust from sanding; you don’t want any of this to get stuck in your stain. I used the espresso stain by Minwax, it gives it a beautiful and deep color that is both rustic and modern. I could not be happier with how the color turned out.
Pour some stain into a disposable bowl, and dip your 4” foam brush. Begin wiping the stain on the wood, pushing it in the direction of the grain. You don’t want any puddles or thick spots, so continue to even it out as you go.
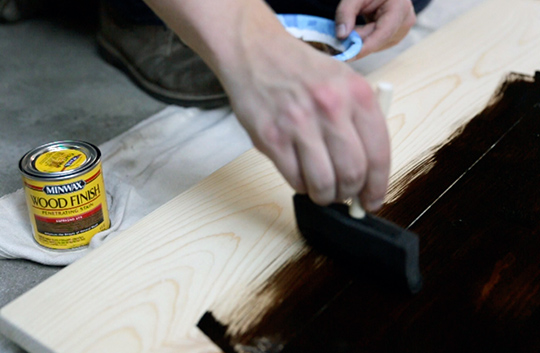
Finish wiping stain across the whole headboard. Allow the stain to penetrate for 5 to 15 minutes, the longer you go, the darker it will be. Then with a clean rag begin wiping off the excess stain, starting at the same place you started brushing.
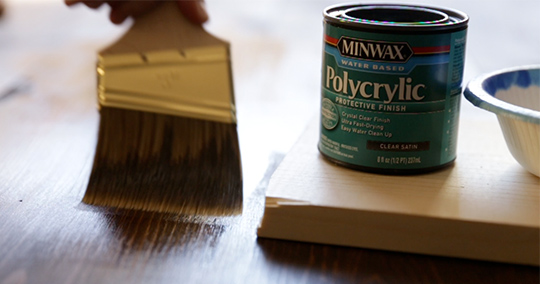
Step 6: Apply Polyurethane
Allow the stain to dry for at least eight hours. Finally, with a bristled brush, paint on the polyurethane in the direction of the grain. Again, spread out any puddles. Poly is kind of like Elmer's Glue so don’t over brush, as it begins to dry you can introduce bristle marks. The poly will protect the wood and will extend the life of the headboard.
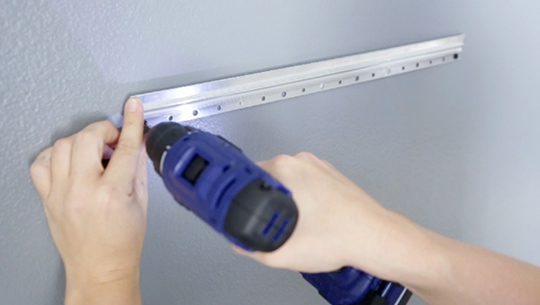
Step 7: Install Hangman System for a hanging headboard
After the poly has dried, flip the headboard back over. We need to install the top clip for the Hangman System. Simply center it along board (D) and screw into place.
Step 8: Hang
The final step is to install the bottom clip of the Hangman System to the wall. Some things to keep in mind when determining it’s position:
- You want the bottom of the headboard to fall below the top of the mattress to give the illusion that the headboard and the rest of the bed are attached.
- You need to account for the lowered position of the top clip compared to the top of the headboard, similar to when hanging a picture frame you don’t put the nail where the top of the picture frame is, you have to drop it down to where the top of the wire or bracket is.
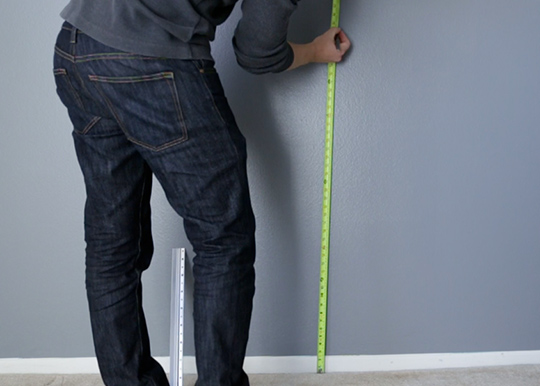
Determine where you want your bed to be, and find the center by dividing the width of your bed by 2. Make a small mark on the wall. Now measure up from the floor to where you’d like the top of the headboard to be, then subtract the distance the top clip is from the top of the headboard. Mark the wall, this is where the bottom clip attaches to the wall.
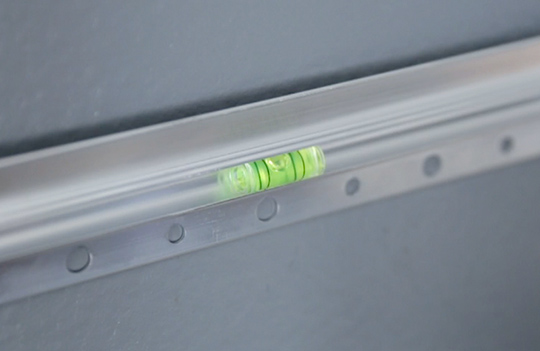
Slide in the little level that comes with the Hangman System and mark your holes for where the drywall anchors go.
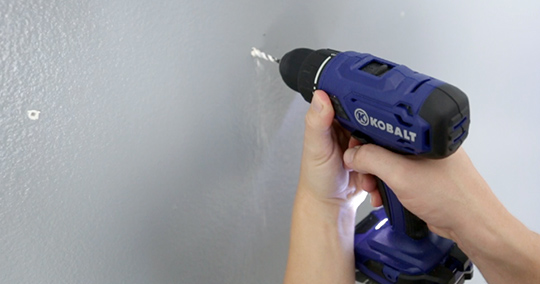
Use a drill bit that is slightly smaller than the included drywall anchors and drill holes on your marks. Don’t fret about making holes in your wall, these can be patched when you move out with spackling. With all the holes drilled, push the dry wall anchors in, tap in with a hammer if necessary to get them flush with the wall.
Place the bottom clip of the Hangman System into position and insert the included screws into the drywall anchors.
Now, simply hang the headboard on the bottom clip just like a picture frame! The great thing about the Hangman System is you can slide it slightly left or right to get the position just right.
That’s it!


![Types of Jackets: An Encyclopedic Guide to Finding Your Perfect Style + How to Wear Them [28 Styles]](https://www.primermagazine.com/wp-content/uploads/2025/10/jacket-types_feature.jpg)