
Coming up with your own furniture is a smart and fun way to put your place together without spending next month's food allowance. Furniture that is any step beyond Ikea starts to get expensive – fast. And, building your own produces something in your apartment you can be proud of. It also allows you to put together a cohesive style on a budget.
If someone in their 20's has a side table at all there's a good chance it's the LACK from Ikea. They're modern and they run about $10. Hard to beat it. Unfortunately they're a simple, ‘flat' design, and just like wearing a t-shirt with a brand name on it, everyone knows where you got it.
So instead, we'll put together our own industrial side table for a relatively cheap price. The greatest thing about this project is that the ‘hardest' part is screwing in some screws. Even if you live in a tiny apartment without many tools, you can still pull this off with ease.
First, let's take a look at some similar industrial side tables on the market that I used as inspiration.
Click on each if you'd like more info.
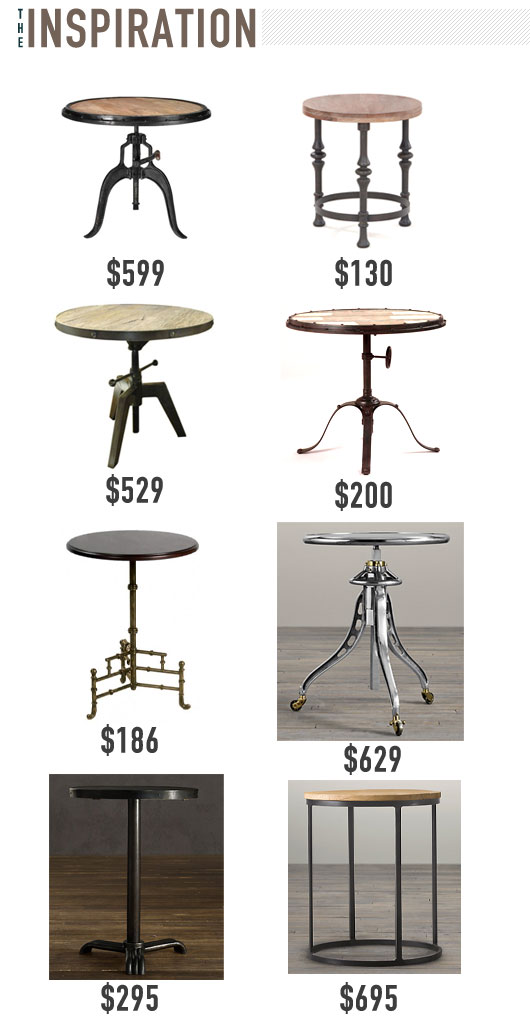
The prices are pretty nuts, right? Even if I was earning half a million dollars a year, I can't imagine spending $700 on a tiny little side table. Ah well, to each their own I suppose.
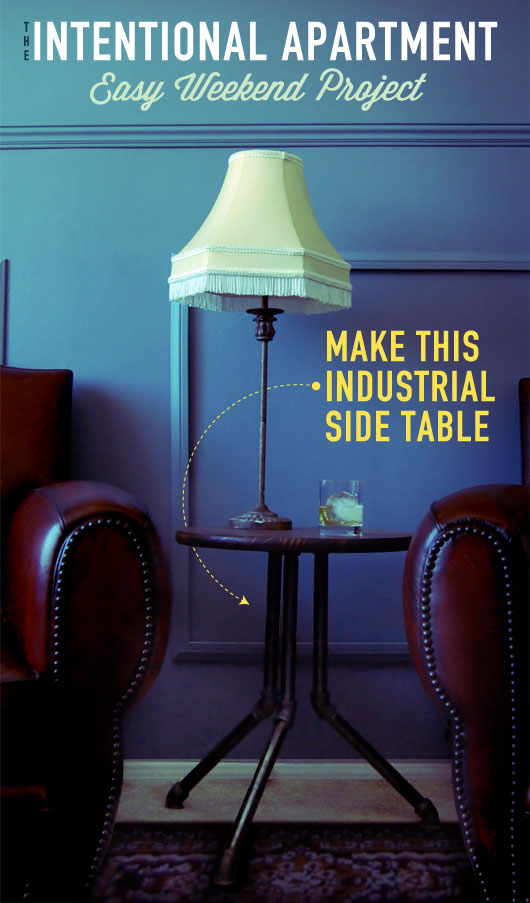
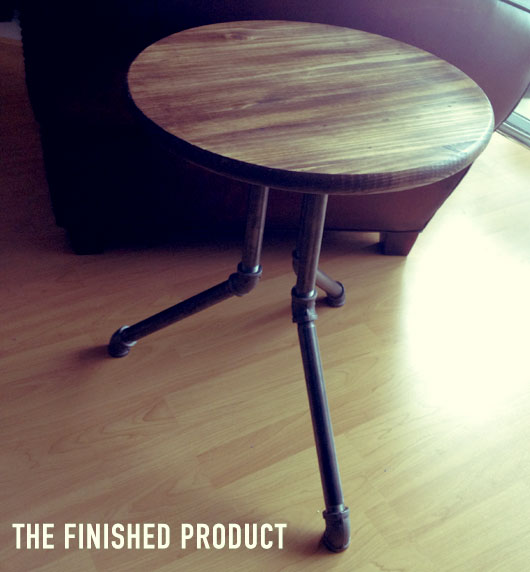
Here's the one I came up with. It's sturdy, unique, and has only a few parts.
You can pick up all the components at Home Depot and the like, or your local hardware.
Industrial Side Table: Here's What You'll Need
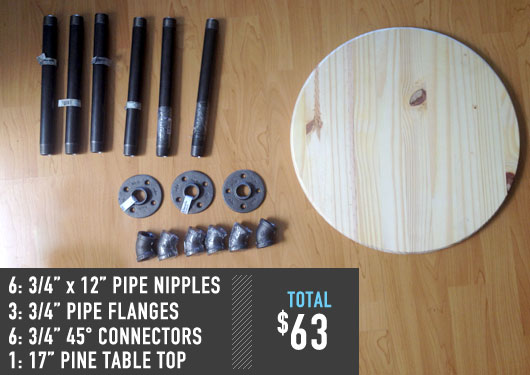
Some of the parts seem expensive, especially the floor flanges at $6 a pop. I'm glad I'm not paying to run piping through a house.
Odds & ends you'll need:
- Screws with a head wide enough to not go through the flange, with a body short enough that it won't go through the other side of the table.
- Something to color the wood. I used stain that I had leftover from my dresser renovation. It's only a few bucks, but you can also make your own like I did for my giant map frame.
- Polyurethane to protect the wood from water marks.
- Felt stickers or something similar to put on the bottoms of the feet so they don't scratch your floors.
Step 1: Screw the 3 Legs Together
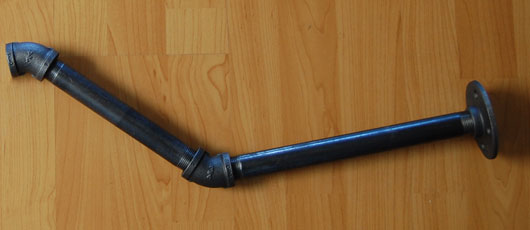
Start by screwing one of the 12″ pipes into a flange. Get it as tight as you can with your hands. (Which, by the way, will turn black from the pipes. Wear work gloves if you have them, and try to not to get your table top dirty.)
Add a 45° connector, then another 12″ pipe. In the photo above my second pipe is shorter, but I decided to use 12″ pipes for both ends to make the table the right height.
Then attach the second 45° connector that acts as a foot.
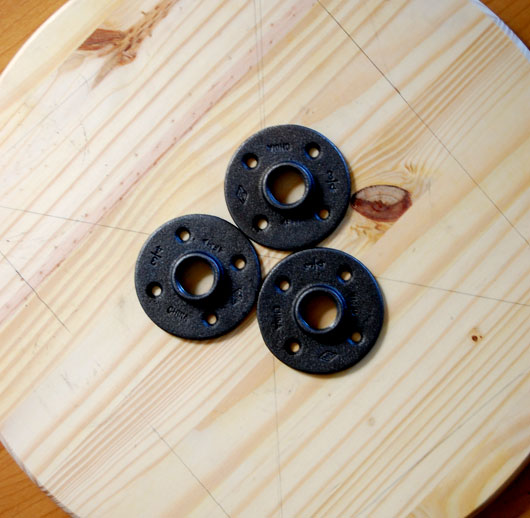
Step 2: Find the Center of the Table Top
We need to find the center of the table top so we can correctly position the 3 flanges. To do this, I utilized aspects of Thales Theorem. I created two right-angle triangles and where the hypotenuses intersect is the center of the circle. Yeah, math!
To get the right angles, I simply used a sheet of paper.

Step 3: Place and Attach the Flanges
Now that we have the center of the circle, position the 3 flanges in a triangle with your center mark in the middle of it. (Pipes removed from flanges for illustration.) Screw your screws in the holes of the flanges to attach the legs. You'll need to support them while you do this, or the first screw will rip out of the wood from the weight of the steel.
Step 4: Stain
There are lot of options here, depending on what sort of style you want to go for. I went with a dark rich stain color that I had left over called Kona. If you use the homemade stain from the map project above, you'll get a weathered look.
Before you begin, however, sand the top and edge of the wood to get a smooth surface.
Staining wood is super simple: Brush on in the direction of the grain; wait up to 15 minutes then wipe off the excess; repeat until you achieve the desired darkness. From there, you'll want to apply 2-3 coats of polyurethane to protect against water rings, which is applied similarly: When the stain is dry, wipe the polyurethane on with a rag or foam brush in the direction of the grain in a thin coat. Allow 2 hours to dry and apply another coat. Let the polyurethane dry completely before using the table.
If you've never worked with stain or polyurethane don't be intimidated – it's really as simple as that.
You could also choose to paint it for a different style entirely. Spray paint would work great for this.
Step 5: Mix an Old Fashioned & Enjoy
Cheers!