
That double knot may have gotten you by on your sneakers but if you need to secure a heavy load or fashion something stylish for an interview you're going to need something Extra Strength. Get these easy to remember knots down and you'll be ready for anything.
The modern man has three basic needs when it comes to knots, and they fall into the categories of Clothing, Kink, and Securing Your Load. Now this is Primer, not Pre-School, so we won't discuss double-knotting shoes. If you haven't got that down yet, you won't find help here, so go pay a visit to Mom before reading…
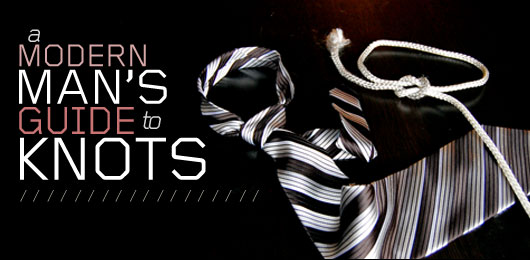
A Modern Man's Guide to Knots
By Jesse Stern
I'll start with rope knots for fastening, securing, and…recreation.
Basic Slipknot
Thanks to Madonna, every man needs to know how to tie up his girlfriend. However, you should not tie up your girlfriend without knowledge of the basic slipknot. (You should also not tie up your girlfriend without her permission, but we'll leave that alone for now.)
The slipknot is great for any knot that is temporary, and that you want to be able to easily untie later. The other advantage is that it's really, really simple. With practice, you can even do it with one hand.
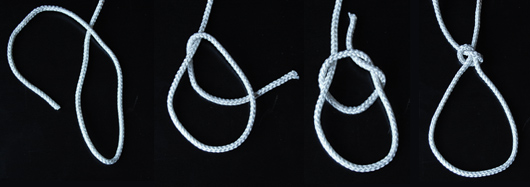
Here's how it works:
- With one end of the rope already tied to something (fence, hitch, your enemy's muffler, your girlfriend's bedpost, etc.), wrap the other end around what you want to secure.
- Tie a light hitch, leaving several inches to make the slipknot.
- Make a loop with the remaining end.
- Use this loop to complete the knot.
To untie, pull the end of the looped side. The loop will pull out of the knot, and … Bada bing!
A cool variation on the slipknot can be used to store an extension cord without tangling. Fold the cord in half, then make a loose slipknot in the looped end. In the loop that you've created, make another loose slipknot. Continue making loose slipknots until the extension cord is manageable. To untie, simply pull on the business ends.
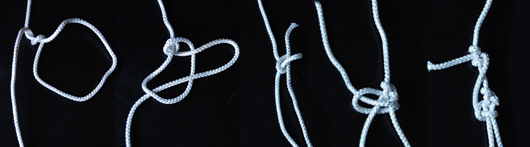
Figure Eight
This is another good knot to know, It's just like a standard knot, except easier to untie. It's good for making loops, tying two ropes together and so on. There are a lot of variations of this knot, with applications ranging from boating to Search & Rescue. The instructions assume you are creating a loop by making a knot in one piece of rope.
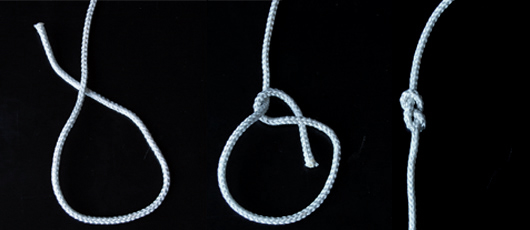
Here's how it works:
- cross the two ends, then cross them again.
- slip one end through the loop. The knot should have one extra twist from a standard knot. It also has a nice symmetrical shape.
- Untie normally. This knot is cool because no matter how tight it gets, it's always easy to loosen because of the knot's shape.
Trucker's Hitch
This is the ultimate “Securing Your Load” knot. It's a little complicated, but the principle is you have a hitch above, secured by a knot beneath. It's used for tying things onto the tops of cars, tying a tarp down onto a stationary platform (such as a truck bed). It can also be used to secure a weight to your fishing line. Its advantage is it holds very tight, but is easy to untie.
For these instructions, let's assume you have a rope that is attached to a tarp; the other end is loose and will be tied around a hook (for example on a pickup truck), thereby securing and tightening the tarp.
Here's how it works:
- A foot or so before the end of your rope, make a loop and twist it a few times.
- Pull another loop toward you through this first loop.
- Pull down till it's tight.
- Wrap your rope's end around the stationary hook, then through the new, second loop that you've formed — and pull tight.
- Make a forward hitch, then another hitch going backward. This forms a square knot that holds the whole thing together. Since the pressure is on the loops, not the knot, it should be easy to untie even after a few hundred miles of truckin'!
The two main types of tie knots are the Half Windsor and the Full Windsor. In both cases, you have to get the distance right. Start with the skinny part pretty short, the wide part pretty long. As you tie, the wide part gets shorter and shorter. When following these instructions, always move the wide (front) part, while the skinny part stays where it is.
Half-Windsor
The Half Windsor is traditionally used by Democrats, and at more casual functions. If you wear a skinny tie, you will want to go with the half-windsor. Anything less than this just looks sloppy.

Here's how it works:
- Start with the skinny side on the right, somewhere around the bottom of the breastplate. The wide part, on the left, should be quite a bit longer.
- Cross the wide side over to the right, and under to the left, of the skinny part.
- Form a hitch by tying it backward (from left to center) through the V that has formed. Now, the seam should be facing forward.
- From here, wrap the tie around the front of the hitch that has formed, to the left.
- Go forward through the hitch, and tuck the tie under the front piece, between the front piece and the knot.
- Pull on the back (skinny) side, to tighten the tie toward the neck. If you've done it right, the two sides should be about the same length, with the wide side being slightly longer.
For a classic style, create a dimple by putting your finger in the top-center of the tie, just below the knot, and giving it a brisk pull. Or, for a casual look, loosen the tie a bit and unbutton your top shirt button.
Full Windsor
The Full Windsor is traditionally used by Republicans, Ivy-Leaguers, and at very formal events. It is similar to the Half Windsor, but with one extra step. You will also have to start with a bit more room on the wide side, because the extra step puts more fabric into the knot.
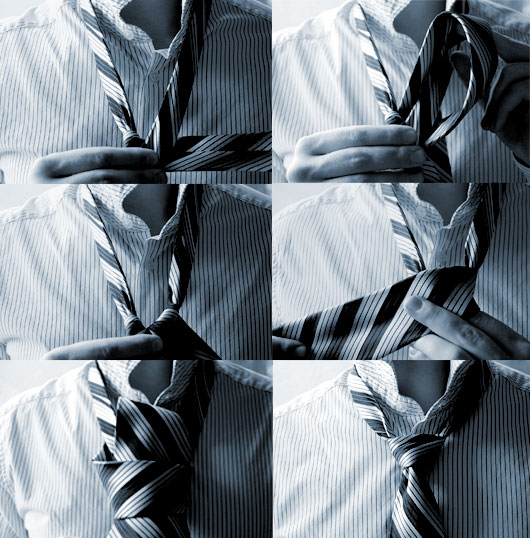
Here's how it works:
- Start with the skinny side on the right, somewhere around the middle of the breastplate. The wide part, on the left, should be much longer.
- Cross the wide side over to the right, and behind to the left, of the skinny part.
- Form a hitch by tying it backward, from the right side to the center, through the V that has formed. The seam should be facing forward.
- Here's the fancy, Full-Windsor, extra step: form another hitch, by wrapping the tie backward around the knot, this time from the left to center.
- Now, we get back in familiar territory. Wrap the tie around the front of the hitch that has formed, to the right, covering the knot.
- Go forward through the hitch, and tuck the tie under the front piece, between the front piece and the knot.
- Pull on the back (skinny) side, to tighten the tie toward the neck. If you've done it right, the two sides should be about the same length, with the wide side being slightly longer.
The Full Windsor has a characteristic even, square look to it.
Bow Tie
Although most bow ties these days are clip-on, the traditional bowtie is way cooler. You can untie it at the end of the evening and leave it draped around your neck, which makes you look like a 30's gangster.
Believe it or not, tying a bow tie is exactly like tying a pair of shoes. And since we're not going to discuss shoes here, you should be able to figure out the bow tie.
Okay, I'll give you a hint.
Make two loops, one facing backward and one forward. Then, just tie ‘em together and even ‘em up.